Northwest Stamper

Tag: heartfelt thanks

  • Watercoloring Techniques: Chalks and Markers

    If you saw my last post, I started sharing some of the cards we are doing in my watercolor technique class (if you haven’t seen it, check it out here).  These cards are meant as a way to introduce you to some of the different ways you can play with watercolor styles.  So, last time was Inks and Watercolor Crayons; and so today is Chalks/Pastels and Markers.  If you have any questions, leave me a comment or send me a note and I’d be happy to help you out.

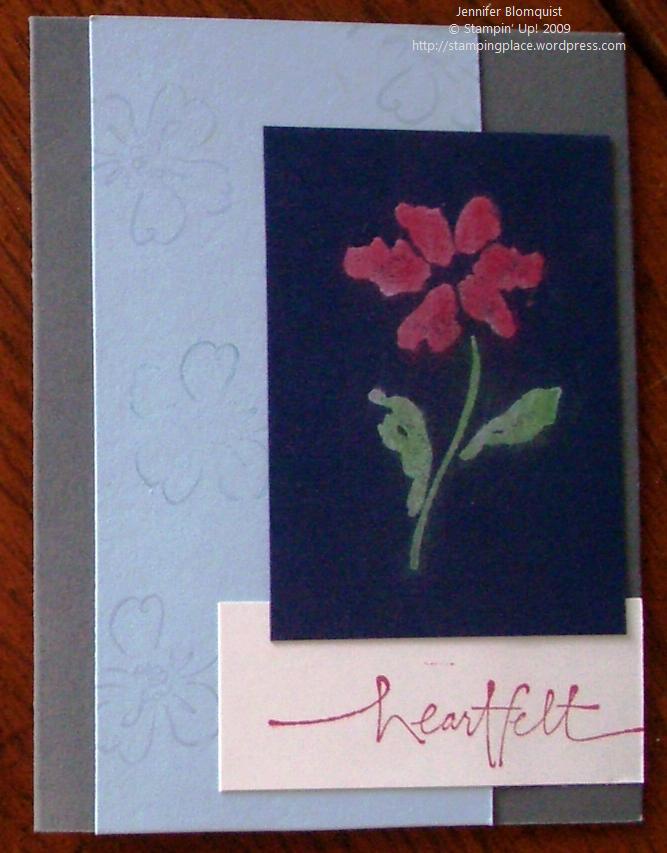
    Watercoloring with Chalks

    Stampin’ Pastels are the chalks offered by Stampin’ Up! and they used to come by default in your Stampin’ Up! starter kit.  So, I had a big set for ages but kept forgetting to pull it out.  But that is when a class like this is great, it reminded me of the different ways you can use your chalks, including watercoloring.  In this example, we did one of the easiest methods which is just to pick up the chalk using a blender pen and then coloring your image.  The nice thing with this method is that you can get a rich color without it being as streaky or dark like you might with a marker.  The difference is that you are essentially picking up the physical chalk with the pen and smoothing that out on your image as opposed to just having some of the ink pigment soaking into the tip of your pen like when you are using inks.

    **If you are interested in chalks, there is a set in the Clearance Rack for a steal!  Its while supplies last so snag it while you can! **

    This is only one of the ways to use chalks.  I have a blog post on other technique ideas for using your Stampin’ Pastels – check out more Pastel Techniques here.

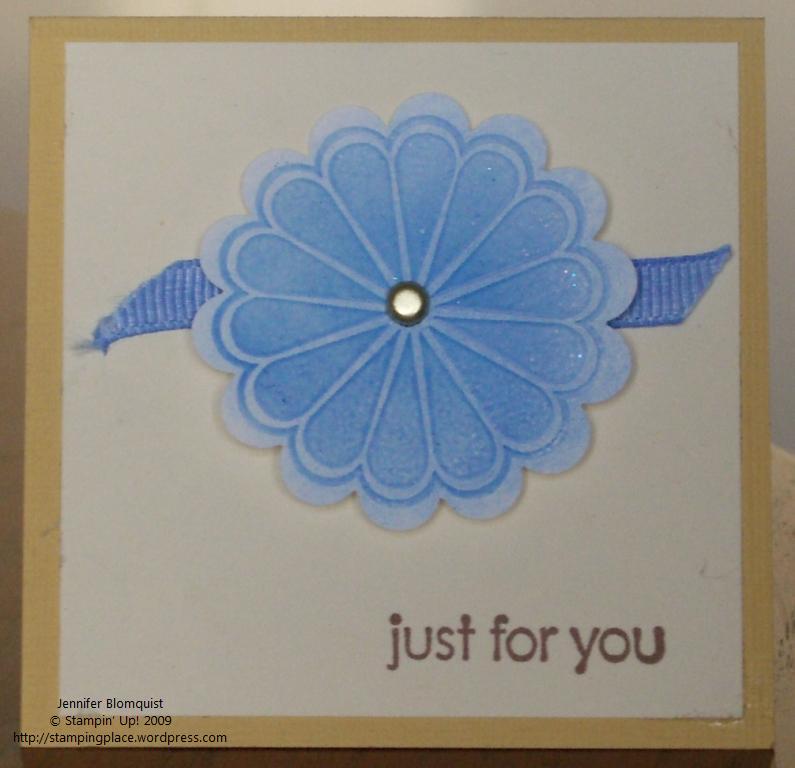
    Watercoloring with Markers

    So, this is a technique I LOVE because it is sooo easy and turns out beautifully.  For this technique, all you are doing is using the Stampin’ Write markers to outline a stamped line art image.  Then pull the color from the outline to wherever you want there to be color fill.  So, in the image below, I outlined the flower head in Rich Razzleberry marker and then used a blender pen to pull the Razzleberry color to fill out the petals.  You want to use the brush head of the marker when drawing your outline so there is enough ink on the paper to blend around.  Also, this technique really works well if your marker is a dye based ink.

    You can also use your markers to do watercoloring in other ways including using the marker to color onto a clear block, ink pad lid, etc and then picking up the color with your blender pen.  The one thing you do not want to do is to try to pick up the color off the tip of the marker using your blender pen.  If you do this, you may start diluting the color in your marker because you can have some of the water or alcohol base in your blender pen soak into the marker tip when you are trying to pull off color, which is no good.

    Card 5
    I’ll be back to post the last card at the end of the week.  Hope you stop back by to see!

    Interested in trying these cards & techniques out yourself?

    In Person
    Do to multiple requests, I’m running my class again on March 28th in the Mountain View, CA area.  I’d love to have you join us. Check out the full details on my meetup site.

    Online
    Or, if you are not local, purchase the supplies for these techniques from my online store and send me an email.  I’ll send you written tutorial instructions for these cards for FREE!  Not sure what you need, email me at jennifer@nwstamper.com and I’ll send you a basic supply list and you can see what you have in your stash and what you would still need.

  • Playing with Pastels

    ahhh… it feels good to back at the blog.  I just getting over a yucky cold and just in time because my technique night was last night.  We were playing with pastel chalks and between my cold and my half-cleaned craft room, I got a bit of a late start preparing for it.  However, I’m happy to report that I’ve made huge progress on my craft room (you can now fit chairs at the table and the table is cleaned off for the first time since moving here last fall :))!  Of course, in the process of prepping for the class last night, my craft table is a mess… so I get that straightened up and share it with you.


    But in the meantime, I thought I’d share what I whipped up as samples for some different techniques.  This was actually my first time in a long time that I had used my chalks and I discovered they are a lot more fun than I remembered.  And the girls did some awesome work with them – I just need to remember to take pictures of what they create!

    pastels_tt_wm2

    The techniques we focused on were popping pastels (the cupcake and the butterflies), coloring an embossed image (the blue scalloped flower), coloring ribbon (the blue ribbon), chalkboard technique (the red flower), and using chalks directly on the stamp to color a stamped image (some of the background flowers on the heartfelt card).


    pastel_ribbon_wmThe flower started out as clear embossing powder over versamark on whisper white paper. After you have embossed your flower, you can take a sponge to your chalk to pick up some color and then rub the sponge over the embossed image to color it. I recommend using brighter colors though because my first attempt with a light blue barely showed up. This card was made using the brilliant blue chalk. And with chalks it is very easy to layer colors. One person, used orange as a base color and then used rose red to color the edges.


    And yes, this is a white ribbon! Use the same sponge to apply color to your ribbon by rubbing along the white ribbon.  You can use sealent afterwards to keep it from rubbing off on your hands but it doesn’t rub off much if you don’t.


    chalkboard_heartfelt_wm This card used the chalkboard technique where you stamp with white craft ink on a dark paper and then pick up the chalk color using a q-tip or applicator.  Once you have the color, you want to tap your stamped image to apply the chalk.  Don’t rub or you will have a lovely smear of white and chalk in places you may not want. 🙂  Once you have applied your colors.  I tapped off excess power and then use a paper towel to lightly wipe off the excess color.  It turns out with a very lovely effect.


    Well, I’ll be back later with hopefully some new goodies to show you (my occasions mini preorder is supposed to arrive today!)  Have a happy wednesday!

  • One set of supplies – two totally different cards

    So, as I mentioned in an earlier post, at my Thank You card stack some of the ladies took my basic card design and reimagined it into a completely different card.  To be honest, that is one of my favorite things about card parties and workshops.  People start getting creative and you come away with so many cool ideas you never would have thought of.  I always encourage folks to change up the designs and make them personal to them, ’cause cool stuff usually results.

    I started out planning to copy one of the designs I saw someone make but ended up twisting it up into another new layout.  I constrained myself to using only the materials (same stamps, same dimensions and colors of paper, same accessories).  Yes, it is the same background paper – all the designer paper is double sided – so I chose to use the backside on the second card.

    This is the original design
    This is the original design
    New layout using all the exact same card supplies and paper dimensions (I just left out the small brown cardstock)
    This is the exact same card materials as the original only in a totally different layout. Ok, I took out the small brown cardstock, but everything else is the same.

    Recipe:  
     Stamps:
    Heartfelt Thanks
     Inks: Pink Pirouette, Chocolate Chip, Ridinghood Red
     Paper: Pink Pirouette CS, Chocolate Chip CS, Whisper White CS, Bella Rose DSP
     Accessories: brads, Stampamajig, Corner rounder punch, paper piercer

  • Thank you cards galore

    ty_stack_wmAfter spending the week getting ready for the craft fair and my thank you card class on Saturday, we had a small group get together to make a set of 12 thank you cards. 

    It was a fun group and the creativity was really flowing.  I was so impressed with the different ideas that people had on how to adapt the cards and try new things.  I’m going to CASE some of their designs since they were so neat.  In the meantime, here are the 3 cards we made.