Northwest Stamper

Tag: gingham garden

  • A Sweet Card with an Envelope Full of Butterflies

    A Sweet Card with an Envelope Full of Butterflies

    Happy Sunday to you!  Today I have one of those cards to share that is a little bit of this and a little bit of that from around your craft room.  But in the end doesn’t it turn out to be such a sweet card?

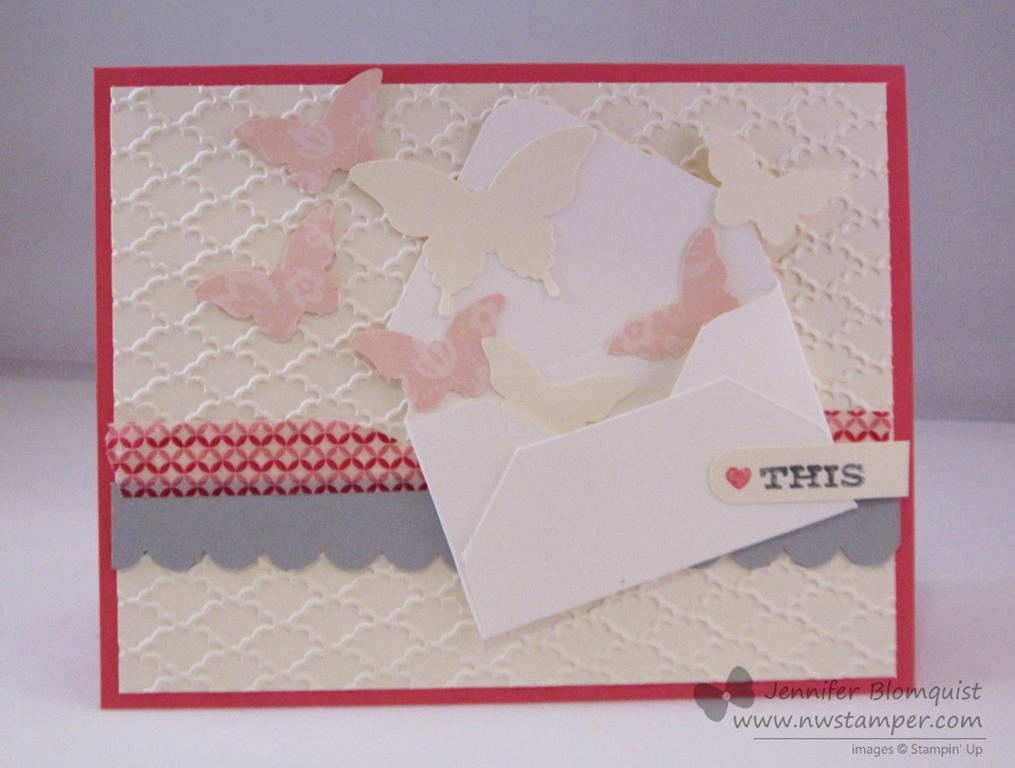
    I had seen a photo of a card that had the idea of an envelope with lots of butterflies flying out from that and so I tried to capture that with the supplies I had at home.  So I started out with my Strawberry Slush cardbase and had to add a bit of texture and so I pulled out my much under-used embossing folder – the Fancy Fan embossing folder.  Then I layered on a strip of Smoky Slate cardstock edged with the Scallop Edge border punch and a piece of the Gingham Garden washi tape.  Again… why don’t I use washi tape more often??  It is so stinkin’ easy and so cute on your projects.

    Finally, the center piece of the card!  I created my own envelope using one of the smallest dimensions on the Envelope Punch BoardSee?  It isn’t just for envelopes for your card!  Put your envelope together, punch out a variety of butterflies and glue them on to look like they are exploding out of the envelope.  Not hard to put together but think of how much of a smile this will bring to someone’s face when they get it from you!  Smile  See, I’m smiling just thinking of mailing it out. 

    Have a wonderful Sunday! 

    spaced shop now sig bar

    April Online Stamp Club Hostess CodeG4VQJ7VB
    Use this code to get free exclusive tutorials & project kit! Learn more

    Stampin’ Up! Supplies Used
    Stamps – Hip Notes
    Ink – Markers (Strawberry Slush, Basic Grey)
    Paper –Strawberry Slush, Smoky Slate, Very Vanilla, Whisper White, Pink Pirouette Designer Paper
    Accessories – Word Window punch, Gingham Garden washi tape, Elegant Butterfly punch, Bitty Butterfly punch, Big Shot, Fancy Fan embossing folder, Scalloped Edge Border punch, Envelope Punch board

    Favorite products:
    134820s
    127821s
    132140s
    117273s
    132622s
    132622s
    132622s
  • Fun with Vivid Vases

    Fun with Vivid Vases

    This week, I thought I’d share some inspiration for some of the fun new stamps from the Spring Catalog.  In my downline group (the demonstrators in my Fun n’ Crafty group) all created some amazing cards and I wanted to make sure everyone got a chance to be inspired by them!

    Today, I wanted to share a stamp that I LOVE that is also great because it is a single stamp, so it doesn’t take up much space, is inexpensive, and can be used a number of ways (even in ways that may surprise you).  For now, though, I thought I would share a couple ideas to get you started!  I’m talking about Vivid Vases.

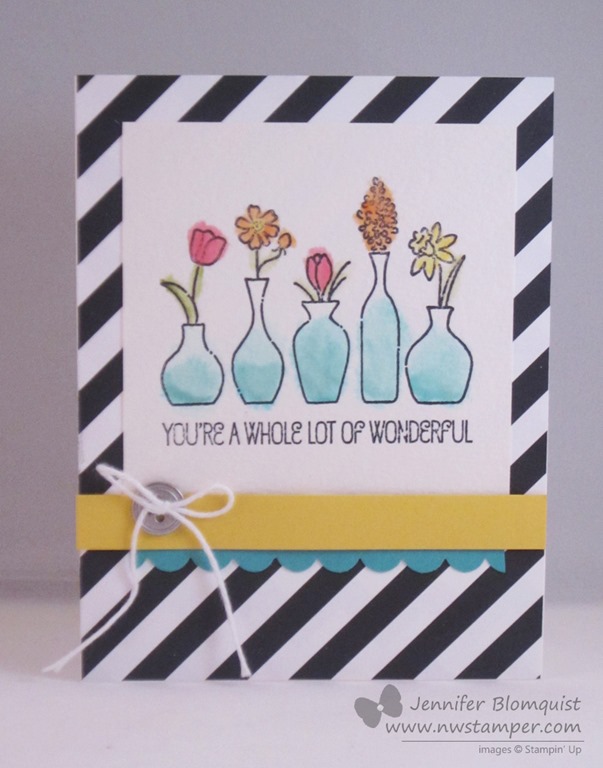
    This was a make & take from Leadership this year and I loved how they used the geometric paper because I sometimes have a hard time figuring out how to use bold patterns but I loved this as a basic black and white striking background for the card.

    But really, the main thing we got to play with for this card is watercoloring the flowers and vases.

    When you want to do watercoloring like this, it works best when you start by

    1. Stamp your image with Stazon ink on watercolor paper.  By using watercolor paper, it lets you use extra moisture to get the mottled and diffused look without it tearing or pilling up your paper.
      Plus it gives your cards a fun texture because the watercolor paper is thicker and textured.
    2. Squeeze your desired ink pad while it’s closed so a little bit of the ink transfers to the top of the ink pad.  Use that like a paint pallet and pick up the ink with an Aqua Pen.
    3. Color your image with the pen like you would with a marker.  Add more color if you need.
    4. When you are done with that color, scribble your pen on a piece of scrap paper until no more color shows on the paper.  Then you can move on to your next color.

    Cute, right?

    Or get more fun colors by using paper piecing like my friend, Liz Mitchell!  Check out her great idea with this stamp set.

    I love how she took contrasting designer paper patterns (in this case from the Gingham Gardens paper pack) and made a mat for her card base and then cut out a smaller piece that she cut an oval out with the Oval framelit.

    Doesn’t it make a perfect picture frame?

    Then to add an extra pop of color with the vases, she stamped the stamp image again on scraps of patterned paper and then just cut out the individual vases.  Then you just glue them down to your main stamped image on a piece of white paper!

    Color in the flower buds with markers and you have a bright cheery card!

    spaced shop now sig bar

    Virtual Stamp Club Hostess CodeBNDDMDVU
    Use this code to get free exclusive tutorials & project kit! Learn more

    Stampin’ Up! Supplies Used
    Stamps – Vivid Vases
    Ink – Stazon, Melon Mambo, Daffodil Delight, Pumpkin Pie, Tempting Turquoise
    Paper – Watercolor paper, Daffodil Delight, Tempting Turquoise cardstock, kaleidoscope designer paper
    Accessories – Scallop edge punch, Aqua Pen

  • Fringed and Fabulous Birthday Card

    Today, the design team over at Stylin’ Scrappin’ Inkspiration decided to do a post sharing ideas using the upcoming Sale-a-Bration items (if you have no idea what that means, Stampin’ Up has a promotion every spring – this time starting January 28th – where for every $50 you order, you can pick any item in this special catalog to get free with your order; which is what we are playing with today!)  And since I wanted to play along, I dug through my limited stash of Sale-a-Bration goodies to come up with a fun project to share. 

    So today I have another “Little bit of this and that” style card to share –

    It all started with the pair of fringe scissors on my desk and a vision of this super duper great fringed card that my downline, Stacey shared in our team facebook page.  I took the inspiration of layered fringing and started grabbing what was lying around on my desk. 

    This included a card base that got ink and spots on it at a recent card class:

    IMG_3986

    And the plan to use my fringes to cover it up… because darn it… it is still a totally usable card base!

    So, I grabbed some scrap paper and started cutting and layering.

    Then I needed something for the top – so Washi to the rescue!  Yup, I used the Gold washi tape and the Gingham Garden washi tape.  Mix and match away!

    Where is the Sale-a-Bration stuff you ask?

    All in the top of the card!

    First up, the super cute sentiment from a new See Ya Later stamp set (and yes, it has a sentiment that says “See Ya Later, Alligator”!  I had to color it in with markers because, well, I just did.

    And then see that flower and those diamonds?  More SAB goodies!

    These are the Sweet Sorbet self-adhesive cork embellishmentsI will warn you – this isn’t your kiddos adhesive.  I stuck one of those diamonds down and when I decided I wanted to move it, it was NOT going anywhere!  I had to carefully slice it out of my card using scissors to get it to move.  So, word to the wise, they are great embellishments, just make sure you have it where you think you want it before pushing it down.

    Stampin’ Up Supplies Used:

    Stamps – See Ya Later (free Sale-a-Bration item)

    Ink – Sahara Sand, Markers: Early Espresso, Raspberry Ripple, Primrose Petals, Daffodil Delight

    Paper – Whisper White, Primrose Petals, Raspberry Ripple, Sahara Sand, Coastal Cabana

    Accessories – Sweet Sorbet Accessory Pack (free Sale-a-Bration item), Gingham Garden washi tape, Watercolor Wonder washi tape, Fringe Scissors

    spaced shop now sig bar

  • Washi Tape on Sale–Make these Projects & More!

    So, I guess the good thing about my internet going out last night and not getting fixed until this morning is that I didn’t get a chance to schedule the blog post I was going to originally share with you today. 

    I still plan to share that project with you soon, but it gave me a chance to see the first of Stampin’ Up’s Daily Deals!  They have decided to offer one product (or set of products) on sale every Thursday of October.

    TODAY ONLY (10/3): you can get any of the following Washi Tape sets for only $3.71:

    Washi Tape daily deal

    So, just to give you some ideas of what you can create, here are some samples I’ve posted in the past.  Click any of the links to see more details on the actual projects:

    Thank You Notes with Gingham Garden Washi Tape Accent


    Frosted Glass Butterfly with Washi Tape Trim


    Scrapbooking with Epic Day Washi Tape Banners


    So, check them out and don’t forget to grab them today while the sale is going on!

    Use Hostess Code XJZ6BCKR when you check out and be entered to win an extra spool of Washi Tape from me!   Smile 


    spaced shop now sig bar

  • Adding a Splash of Washi to Your Cards

    So turns out when I start working on something, I can get really focused on that task.  In the case of last week, that task wasn’t any of the handful of crafting projects and event prep I needed to work on, but instead was an even more daunting task – picking a preschool for Nicholas!  2013-08-23 12.29.45

    Awww….aren’t they getting so big? Smile 

    I thought it would be a quick and easy thing to figure out, and I’d be back working on my other projects right away.  But, no…. there are so many choices and variations.  Thankfully, we were able to find some good options and start the process for getting him enrolled, so now I’m able to get back in the crafty mindset!

    And first on the docket – Thank you cards!

    I always like to send thank you cards to everyone who places an order with me and I wanted something bright and cheery to remind us that summer hasn’t quite ended yet!

    I used 3 of my favorite items right now:  Washi tape, Flower Shop bundle, and the Oh Hello stamp set to put this together.

    Card Supplies Used
    Stamps –
    Oh Hello, Flower Shop
    Ink – Island Indigo, Daffodil Delight, Rose Red, Gumball Green
    Paper – Rose Red, Whisper White
    Accessories – Posy Punch, Gingham Garden washi tape, Stampin’ Dimensionals

    So, if you’ve ordered with me in the last few weeks… check your mailbox for your own copy of this card!

    If you’ve ordered with me in the last month and NOT received a card, please let me know!  There have been some hiccups in the Stampin’ Up! ordering system and some demonstrators have not been receiving notice about orders placed.  I want to make sure I’m giving you the best possible service, so if you haven’t heard from me, let me know so I can fix it. Smile 


    But no matter what, THANK YOU for stopping by and please come back soon!


    spaced shop now sig bar