Northwest Stamper

Tag: friend card

  • Mix & Matched Gold for the Perfect Friend Card

    Mix & Matched Gold for the Perfect Friend Card

    Alright, we’ve reached the last day of my 10 days of Celebration of my 10 years of being a Stampin’ Up demonstrator!  I have been sharing projects and ideas over the last few days and hopefully you’ve found some fun ideas to try.  Now, since this post was supposed to go live yesterday (whoops!) I’m extending the deadline to enter all the giveaways until 9pm pst tonight.  So, make sure you have followed the links near the end of this post to enter all of the prior days by leaving comments on the blog and then leave a comment for todays as well.

    I am also offering a free gift with purchase on all orders today – you get to pick your favorite gift that I offered over the last 9 days to be your freebie!  If you round your order up to $50, don’t forget you’ll be earning a bonus days coupon to boot!  So, stack on the extras while making a dent in your wishlist. 🙂Bonus days! Spend $50, get a $5 certificate to use in September

    Today’s Project – Gold & White Friend Card

    Elegant friend card with Springtime Impressions

    I was blown away by the card I’m sharing with you today.  It was created by my friend Breelin Renwick – who is an amazing stamper – for a swap.  It is such a good example about how little touches of gold can really make a huge impact on the finished look of your card!  This card mixes and matches the gold foil in the doily, punched out leaves using gold foil paper, and the gold mini sequins.

    Elegant friend card with Springtime Impressions gold foil leaves

    The sentiment and stamped flowers is from the Love What You Do stamp set and it goes so perfectly with the rest of the items from the Garden Impressions suite.  I will admit, the watercolor impressionistic flowers and designs from this suite doesn’t call to me when I see it all together like in the pictures in the catalog; but changing out the stamp set and using the designer paper and the dies as a pop of texture and color really works for me!  It makes for a stunning, soft background that lets your shinier elements really stand out, don’t you think?
    Elegant friend card with Springtime Impressions embossed die cut

    But the hidden amazing touch is the *embossing* using a thinlit die!  Can you see it in the picture above?  The large, corner die that cuts out flowers and leaves was instead used to emboss the paper, making a pretty raised texture without the need for fussy gluing.  To get this effect, you need the Big Shot Embossing Mats.  They come with a guide that tells you how to use ANY of your dies for embossing instead of cutting.  The embossing mats are a mix of silicone and thin plastic sheets that allow you to get just the right shim where your dies can be pressed into your paper to give the raised impression but not pressed so hard that they cut your paper.  So awesome, right?!

    I’ve used the embossing mats before in class, so I promise I’ll post more project ideas with them soon!

    Make it at home!  Here are the supplies you’ll need:


    LAST DAY – Anniversary Celebration

    Its the last day of my 10yr Anniversary Celebration!  I was a little behind on getting day 10 out, so you have until 9pm PST TODAY (8/9) to get your comments and orders in before I draw winners tonight!

    Quick links to enter for the first 9 giveaway gifts here:

    Day 1 giveaway | Day 2 giveaway. | Day 3 giveaway | Day 4 giveaway | Day 5 giveaway | Day 6 giveaway | Day 7 & Day 8 giveaway | Day 9 giveaway

    DAY 10 GIFT– Free gift with a $40+ order – YOUR CHOICE!
    Pick any of the gifts from days 1-9 and you can choose which you would like with your order TODAY ONLY!

    you must use host code 3XPZF4KW for orders under $150
    Shop here

    Peaceful place watercolored card

    DAY 10 GIVEAWAY – WIN A SPOOL OF BERRY BURST METALLIC EDGE RIBBON!

    TO ENTER – Leave a comment on this blog post sharing what type of project you think you’ll be working on next to be entered to win!  Winner drawn randomly on 8/9/2018.

    Berry Burst Metallic Edge Ribbon

    Don’t forget – you can go back and enter all 9 of the previous days giveaways.  You have until 9pm PST tonight to get your comments in. 🙂  Good luck!Thanks for reading! Shop Stampin' Up by clicking here


  • Pretty Tone-on-Tone Backgrounds with Delicate Details

    Pretty Tone-on-Tone Backgrounds with Delicate Details

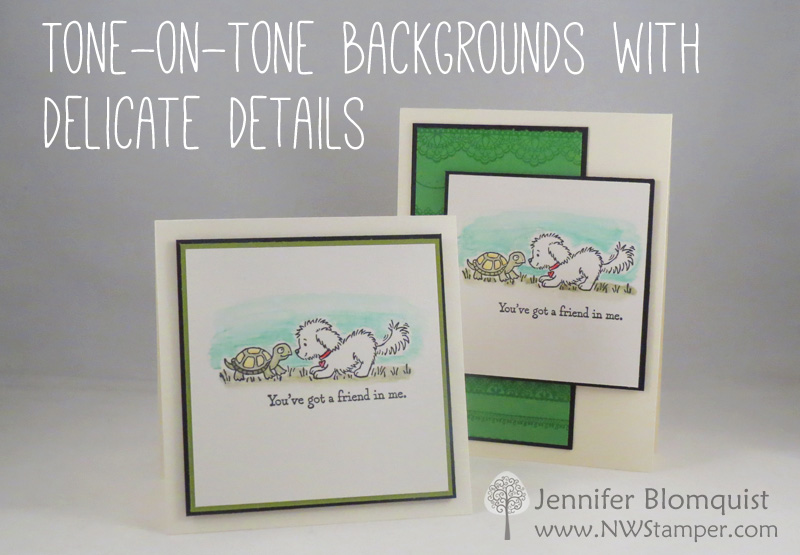
    March is fast coming to a close and that means we only have 2 days left of Sale-a-Bration and the chance to get some of these cute sets like the Delicate Details stamp set! It has so many possibilities including lace borders, emboss-resist techniques, etc.  But my favorite idea with it – and one of the easiest- is to create fabulous tone-on-tone backgrounds using the lace.  Check it out:

    Cucumber Crush tone-on-tone background with Bella & Friends - Jennifer Blomquist, NWstamper.com

    I always think of lace stamps as being delicate and ideal for weddings and love cards, but you don’t have to keep it to those boxes!  I had created a simple card using this Bella & Friends stamp set, but wanted to add a little more to the card.  So, I started from a card I shared recently in my email newsletter (if you aren’t a subscriber, sign up HERE so you can get access to exclusive tutorials too!).  It was super easy to create because I grabbed one of my largest clear blocks and mounted all of the stamps onto it at one time.

    TIPSquish your lace stamps closer together than you think you might want them. Because of the little extra bit of photopolymer that is around the edges of the stamp image itself, it creates some space between the images.  So, start very close together… you can always spread it out more!Delicate Details lace tone-on-tone background in green - Jennifer Blomquist, NWstamper.com

    For this card, I stamped the images using Cucumber Crush ink onto Cucumber Crush cardstock.  This is one of the retiring colors, so I had to get in some more time with it before it goes.  But this technique looks beautiful with other colors, and especially with bright colors such as Watermelon Wonder (another retiring color)

    TIP: The 2015-2017 In Colors are retiring at the end of May, but DON’T WAIT until then to stock up!  The reinkers will sell out in late April when the retirement list is officially announced (though last year, one color was gone before the retirement list even posted!) so get your cardstock and reinkers now before they are gone.

    Finally, I added one more touch with the Cucumber Crush striped ribbon sticking out of the side of the main image.  Don’t forget to use those ribbons… if you have a size that is a little bigger than you know what to do with, having a few ends stick out the side is a great use for them!Bella & Friends colored with Stampin' up watercolor pencils - Jennifer Blomquist, NWstamper.com

    I mentioned above that I started from a simpler card, I thought I’d share that card too!  This was my “easy card” from a private card class.  We were making 4 cards and the other cards had die cutting and multi-step stamping.  So I wanted everyone to finish with a card that was fun, relaxing and satisfying.  We broke out the watercolor pencils and let the Bella & Friends image be the highlight of the card.
    Clean and simple card using Stampin' Up Bella & Friends and watercolor pencils - Jennifer Blomquist, NWstamper.com

    2 Days Left to get your FREE Sale-a-Bration items – including Delicate Details for making your own Tone-on-Tone Backgrounds!

    Just a quick reminder, that if you have been meaning to get your order in to grab your free Sale-a-Bration items… you only have 2 days left!  You have until Friday night to be able to earn any of these items for free.  NOTE the extra designer papers, cardstock, and washi tape from the Occasions Catalog that has been added as an option for you.  Here is what you can get:

    2017 Sale-a-Bration final free product offerings

    How to redeem your free items:

    1. Visit www.nwstamper.com/shop and pick out the items you want to order from your wishlist – anything from the Annual Catalog, Occasions catalog, and Clearance Rack
    2. On the shopping cart page, in the bottom left of the page will be a link to select your free Sale-a-Bration choice(s) – one for every $50 you have ordered.
    3. On the shopping card page, if your order is less than $150, enter 42ABGMYK in the hostess code text box, and I’ll also send you a copy of the March Premium Tutorial pack too!
    4. Check out and those free items will be added to your box at no additional cost at all!

    You just have to do that by the end of day Friday!  Feel free to email me at jennifer@nwstamper.com if you have any questions.

    Want to make this card at home? Here are the project supplies:
    March Rewards Hostess Code is 42ABGMYK


    NWstamper signature_thumb[9]

    order online button for sig 3_thumb[4]

    March News, Notes, and Specials!

    • March Hostess Code is 42ABGMYK – Use this code when you shop online with me and earn extra perks!
    • ONLY A FEW WEEKS LEFT! Sale-a-Bration is coming to an end on March 31st.
      • For every $50 ordered, pick any item from the Sale-a-Bration catalog to get for FREE added to your order
      • Place a $250 order or party and get an extra $25 to spend for FREE!
      • BEST DEAL – if your wish list is over $100, consider getting the demonstrator starter kit and joining my Fun n’ Crafty Stampers.  You get to pick out $125 in product for $99, get 20% off all your future orders, get 2 stamp sets of any value to add FREE to your kit during Sale-a-Bration, and join the amazing community of my team and demonstrators worldwide online.  Get started here
  • Fun Friend Card with Paper Pumpkin Welcome Kit Stamps

    I’ve been subscribed to My Paper Pumpkin since it started and so each month, I tend to get excited about the newest projects and stamps that come in the mail each month, and I sometimes forget about the past stamps.  But with the August promotion where you can get your first 2 months for only $10 a month (including shipping!), I have had some new friends join Paper Pumpkin this month and get the welcome kit.  So, I wanted to send a little note saying hello and thank you and decided to pull out those stamps that come with the welcome kit.

    This is what I came up with:

    It all started with a card base that I had made a while back by embossing the entire card front with the Honeycomb embossing folder.  Then just started adding some fun elements that were lying around my craft room.  I loved how the new burlap ribbon made a fun border for my scrap of Whisper White cardstock that I stamped with the speckled splatter stamp.

    So I hope they like it!  I really had fun with it and think I may need to make a few more!

    Don’t forget – the 50% savings for the first 2 months ends August 31st!  You can cancel or skip a month anytime with no penalty, so if you’ve been thinking about trying it out, don’t miss out on this great deal!  Plus I’ll send you one of these cards as well to thank you for joining. Smile  Get your no-obligation Paper Pumpkin subscription started here and use promo code PUMPKINDEAL!

    Card Supplies Used

    Stamps- Paper Pumpkin Welcome Kit
    Ink – Crumb Cake, Island Indigo, Daffodil Delight
    Paper – Daffodil Delight, Whisper White
    Accessories – Linen Thread, Burlap Ribbon (SU Holiday catalog), Glue Dots, Big Shot, Honeycomb embossing folder, Decorative Label punch

    spaced shop now sig bar

  • How to Make Your Own Flocking & Add Fuzz to Your Projects

    When I was playing with the Swallowtail stamp, I realized that it was a big stamp… seriously, like background sized big stamp.  And I was trying to figure out how I wanted to use it.  So, I cut and I played, but I really wanted to keep the full butterfly image for my card.  So I let go of my 4 1/4” x 5 1/2” boundaries and let my butterfly fly!

    But then as I was working on the rest of my card, I decided that the Honeycomb embossing folder looked a bit too tall… too sharp for my card.  So I grabbed my handy sanding block and started rubbing down the layers.  When I was done, I was much happier with my cardstock and I had a ton of extra fuzz collecting on my desk.

    That fuzz makes awesome flocking!  If you don’t know what flocking it, it is like glitter only instead of being a jar full of reflective bits, it is a jar full of fluffy fuzz.  It is perfect to add as a layer over parts of your stamped image or card that you want to have a plush texture and when you make your own, it perfectly matches the rest of your project.

    Here is a close up of how my honeycomb looked when I was done sanding and you can kind of see the butterfly body too:


    I even made a video so you can see how I made it!


    To Order Stampin’ Up! Products Anytime, click here!

    Supples Used
    Stamps
    – Swallowtail, Fabulous Phrases
    Paper – Whisper White, Crumb Cake, Lucky Limeade, Wisteria Wonder
    Ink – Early Espresso
    Accessories – Big Shot, Honeycomb Embossing Folder, Rhinestones, Sanding Block, Stampin’ Dimensionals

    image

  • Some Ideas For Your My Paper Pumpkin Welcome Kit

    This last week, I have been performing my civic duty by heading to the district courthouse each morning to report for jury duty.  Most people are not excited by being called for jury duty, but with two overly energetic toddlers in the house and a mom who offered to come help watch the kids, I was actually looking forward to the relative quiet and time away.

    But I knew that there was likely going to be times when I was sitting around waiting and so I wanted to take something with me to keep me entertained.  And then it hit me the night before I was due to report and I was trying to figure out what I could grab to make my own crafting kit to go — why not just take my “Welcome Kit” box from My Paper Pumpkin?  All I needed to do was throw in some adhesive and my bone folder and I was ready to go!

    My Paper Pumpkin at Jury Duty

    So that is exactly what I did!  Smile  This is me sitting in our waiting area bench getting ready to start.  I found that the box, when closed, makes a fine table for assembling.

    Now, I like that I can make 4 of the same card with this kit… but what if you don’t want 4 of the same card?  I decided to try to create a variety of designs using only what I got in the kit when making my cards. And this is what I came up with:

    The card on the right is the design that is shown on the instruction sheet with the welcome kit supplies.  The card on the left is a bit of a variation.  (and psst – I couldn’t take scissors with me to court, so I made my left card look like the designer paper was skinnier by wrapping it around the left side of the card and adhering it to the back of the card base as well.  Tricky, huh?!)

    And here are two more designs I came up with while playing around.  I ended up using all of the contents of my card with the exception of part of one of the green scallop stickers.  But I love that each of the cards is just a bit different from the other.

    If you had other stamps at home, change up the sentiments or start adding even more embellishments for even more options.

    Have you signed up for My Paper Pumpkin yet? Did you get your bonus?

    Remember, you need to be signed up by Sunday, March 10th to make sure you get your Welcome Kit in mid-March and receive the new project kit in April!  If you sign up after the 10th, you will get your welcome kit mailed out in mid-April and then start receiving your regular monthly project kits in May.

    Visit http://mypaperpumpkin.com to get started

    Please make sure to select your demonstrator when you sign up too!
    If you aren’t sure how it works, this is what it will look like once you provide your name/address/cc info:

    image

    Thank you for your support!


    To Order Stampin’ Up! Products Anytime, click here!

    Are you earning your Northwest Stamper Rewards?

    Every order gets you closer to your FREE stamp set!  Click here to learn more!

  • Affection Collection Convention Make & Take Card

    Ok, I’m going to make today another quick post.  Today is the start of my HUGE craft garage sale (I think this time is bigger than last time!)  So, I’m finishing trying to cram everything on 6 – 6ft tables, 1 – 4 ft table, 3 card tables, 4 tv-trays, and any other surface I can find!

    Come shop for a ton of great deals today in Bellevue,WA from 9am to 3pm!

    check out my events page for address information

    If you aren’t local, watch my blog and facebook page for a special BOGO sale for remaining items!

    Ok, now on to the pretty pictures, right?  🙂

    This is one of the Affection Collection (found in the new Holiday Catalog) make and takes we did at Convention this year.  The thing I love about this card is that it is soooo easy and doesn’t take a ton of supplies – yet it looks really cool.

    See, check out the image closer up:

    All you are doing is layering different images from the stamp set to make a cool collage look on the front of your card.  Here is what all is included in the stamp set:

    Affection Collection Wood-Mount Stamp Set

    Cute huh?

    Alright, well I know I’m keeping it short today but I hope you have a great Saturday and I’ll be back with more fun project ideas soon!


    To Order Stampin’ Up! Products Anytime, click here!

    Check out the 2012 Holiday Catalog in PDF form

    Are you earning your Northwest Stamper Rewards? Every order gets you closer to your FREE stamp set! Click here to learn more!

  • Bitty Button Friendship Card

    I recently wanted to make a card for a stamping friend so I could show her the new, fabulous seam binding ribbon (seriously, I can’t get enough of this stuff right now – I love how it is delicate and soft like silk yet more opaque than organza.)  So, I put together this sweet and simple card for her. 

    The bow is not tied and instead the loops are held together by a rhinestone brad, which is then punched through the Crumb Cake cardstock.  Had I been thinking before I added the bow, I would have loved to use my Color Spritzer and added some splattering of Soft Suede ink to the Crumb Cake cardstock first, but I guess I’ll have to save that for next time.  So, instead I added some Bitty Buttons covering the matching shapes punched out of the Botanical Gazette designer series paper.

    Tip: When you are using matching paper shapes with clear buttons, I find I get the best results by adding a light layer of Crystal Effects to the back of the button and then using that as the adhesive to stick the button to the paper.  You don’t need a lot of Crystal Effects, but you want just enough lightly cover the entire side of the button.  This gives you a perfectly clear adhesive with out those weird shadows you can get with glue dots or tapes and other adhesives.

    This card was centered around the pretty Rose Red Seam Binding ribbon.  But I bet it would be great with the other 6 colors of Seam Binding ribbon.  Which color is your favorite? 
    See all the Seam Binding colors here in the online store.


    Bitty Button Friend Card recipe:
    Stamps: 
    Curvy Verses
    Ink:  Soft Suede
    Paper:  Whisper White CS, Crumb Cake CS, Botanical Gazette DSP
    Accessories:  Bitty Buttons, Itty Bitty Shapes Punch Pack, Rhinestone Brads, Rose Red Seam Binding Ribbon, Scallop edge Punch, Crystal Effects

  • The Occasion Mini is here

    Occasions11_USHave you had a chance to check out the Occasion Mini catalog yet?  This year I think they’ve done a great job of offering a wide range of stamps and accessories – from vintage to modern, masculine to sewing notions, plus NEW PUNCHES!!  I love punches, especially when they match stamp sets, so it was so fun to get to see a punch and matching stamp set for building a flower (it punches out the flower petals and leaves) and building a cupcake.  I still need to finish up the projects we started when my mom came to visit over the holidays but I can’t wait to share them with you as I do.

    But until then, I wanted to share a card that was posted on my demonstrator website.  It was created by Stampin’ Up! but just love how fun it is!  It uses some new stamps, paper, buttons, and pom pom ribbon.  These are from the Sew Suite collection and I love seeing how you can use them in fun modern ways. 

    So check out the mini and I’d love to hear what you think.  My favorite item right now is the Botanical Gazette designer paper.  What is your favorite?

    Friend Card Recipe:
    Stamps:
      Sew Suite, You’re a Gem
    Paper:  Daffodil Delight Card Stock, Early Espresso Card Stock, Melon Mambo Card Stock, Tangerine Tango Card Stock, Whisper White Card Stock, Sweet Stitches Designer Series Paper
    Ink: Early Espresso, Melon Mambo, Tangerine Tango
    Accessories: Daffodil Delight Pompom Trim, Melon Mambo Pompom Trim, Sweet Stitches Designer Big Buttons, Rhinestone Basic Jewels, Stampin’ Dimensionalsm Eyelet Border Punch, Itty Bitty Shapes Punch Pack, White crochet thread