Northwest Stamper

Tag: faux stitching

  • A Christmas Card with a NEW Tree Punch for the NEW Holiday Catalog!

    Yay!  Today is the day!  The new Holiday Catalog is here!  Over at the Stylin’ Stampin’ Inkspiration blog, we are sharing some of our favorite new items from the Holiday Catalog.  Did I mention – Yay! It’s here!?  ha ha!

    image

    View the Holiday Catalog here

    Shop Online for all the new Goodies here
    (PS – I have some very special project kits using the Curvy Keepsake box that I’ll be sending out to anyone who orders from me using hostess code PA6NRD4S through 9/1!)

    But I don’t want to just tell you that the catalog is here… how about I share a project made from the catalog as well?

    This card uses a lot of new products from the holiday catalog and actually comes together really easily!  I was inspired by a card created by Rita Wright for this sample. 🙂

    Tips for making this card:

    • Use the new Stars mask from the Annual catalog and sponge over Smoky Slate cardstock with Whisper White craft ink.  I recommend using a Sponge Dauber because it helps your ink go on very solidly and smoothly.

    • When using a mask, make sure you “daub” – just tap down over the mask!  If you try to rub side to side, you risk bending up part of your mask and/or getting ink under the outline shape you want to be coloring.
    • Add some faux stitching with your white gel pen around the edge of the card to keep all those stars in Smile
    • Use the new stars embossing folder from the Holiday catalog to emboss some Real Red cardstock for your banner to tie into the masked stars
    • The Festival of Trees stamp set is AWESOME because (1) there is a PUNCH to match the tree!  And you know I’m a sucker for punches.  And (2) because this is a photopolymer set, you can stamp your main tree image in green & brown, and then it is super easy to stamp the red ornaments in the holes.  Seriously!!  I thought it was going to be a pain to line up but it was cake.  Ahhh, sometimes photopolymer is exactly the right way to go!

    So if you are thinking at all about holidays (halloween, fall, Hannukah, Christmas, etc) check out the Holiday Catalogand have fun!

    Shop online here & don’t forget!
    Use hostess code PA6NRD4S through Labor Day and I’ll be sending out adorable Santa and Pumpkin project kits using the new Curvy Keepsake boxes to everyone who orders.  I’ll have a peek at those tomorrow!

    LAST DAY for FREE PRODUCT too!

    Just a reminder that today is the last day for the Starter Kit special as well! I would love to have you be a member of my stamping community and join our fun swapping, sharing, chatting group as a demonstrator.  Whether you are looking to get a great deal on a chunk of your holiday catalog wishlist or want to earn extra money for holiday gift giving, now is a great time to do it!

    Photo: Just a reminder, only 2 more days of the starter kit bonus promotion!  I'd love to have you join my demonstrator family.  Have questions?  Post them here and I'll make sure to answer them all!

    Get $150 in products for only $99 and FREE shipping!  Get started picking your goodies now. Smile

    Have questions, I’m here to help!  Just email me at jennifer@nwstamper.com and I’ll get back to you asap.

    spaced shop now sig bar

    August Online Stamp Club Hostess Code – TT2NETD4
    Use this code to get free exclusive tutorials & project kit! Learn more

    Card supplies used:

  • Little Bit of Love

    Little Bit of Love

    I have a few more cards to share that have a love theme and so as we work our way to Valentine’s Day in a few days I thought I would post them here for last minute ideas.  Today’s card uses the stamp set that I was so excited to get at leadership and have been woefully slow at using – Love You to the Moon!  I mean, look at these cute images:

    image

    Love You to the Moon – #133143 (clear)/ #133140 (wood)

    I origionally started this card for a Stylin’ Stampin’ Inkspiration design team project themed on using your markers – but I had a little love/hate relationship with the card and ended up doing something completely different.  But, I still like some of the details of this card so I thought I would share it anyway. Smile

    The very first thing that started this whole card off was the diagonal rows of “Love you” on the bottom half of the card.  I stamped most of them in Midnight Muse and YES, I used the stamp-a-ma-jig!  I am an imperfect stamper and am ok with things not being totally straight, but in this case I don’t think even I could have handled the randomness if I didn’t use the stamp-a-ma-jig!  The lone red Love you was colored with markers.  I used Raspberry Ripple for the “Love”, Midnight Muse for the “you” and even Chocolate Chip for the head and tail of the arrow.  Then, to help pull it together, I used my Summer Starfruit maker to create little dots between each of the sentiments.

    After I had the stamping done, I looked at the card and it wasn’t quite sitting right with me.  I loved the look, but I didn’t have a plan for layering anything else on.  So, I started by creating a border using the Watercolor Wonder gold washi tape (both the solid and the stripe patterns).

    Great, that looked good, but now what?

    Well, this is where things started getting haphazard!  I started grabbing scraps of paper and ribbon and stamps and started playing around.  In the end, I liked the pennant idea coming down from the corner so I put those one.

    But they looked too plain, so I tried some faux stitching with my markers.  That was ok, but it still needed something, so I added an additional sentiment to the Raspberry Ripple pennant for a final touch.


    I won’t go so far as to say this is a favorite card of mine, but like I said, I think there are some fun elements to it.  If you have any suggestions for tweaks or improvements, I’d love to hear!  Leave me a comment and when I redo this card, maybe that will help make it look better. Smile

    On a side note –

    If you don’t already get copies of my blog posts each day in email, you may consider Following my blog with Bloglovin.  I currently help people get subscribed using Feedburner but Google has stopped supporting it and so it may stop working when I don’t expect it.  So in the meantime, I’m checking out other options and one option I know a lot of people are liking is Bloglovin.  I’m going to try as well and hopefully love it!

    spaced shop now sig bar

    Stampin’ Up! Supplies Used
    Stamps – Love you to the Moon
    Ink – Midnight Muse, Raspberry Ripple, Markers (Midnight Muse, Summer Starfruit, Raspberry Ripple, Chocolate Chip)
    Paper – Whisper White, Summer Starfruit, Raspberry Ripple
    Accessories – Watercolor Wonder washi tape, Stitched Satin Ribbon (Midnight Muse)

  • Using Your Paper Scraps for a Cute Valentine

    Alright, I know I’m the queen of blabbering on and on in my blog posts so I’ll try to keep this one brief.   (Wish me luck!)

    I got a day recently to spend all afternoon stamping and so I got to work making thank you cards, swap cards for this week’s leadership conference with Stampin’ Up, and just play with my new supplies.  However, I gave myself a challenge to try to use up my left over scraps of designer paper and left behind pieces when I cut out ovals and shapes with my Big Shot.  Basically, get them used now instead of having them sitting around because “they are perfectly good punch outs that I can use sometime” and never use. Smile 

    So, this is what I came up with for some of my left over strips of paper after I made the watercolored thank you cards I shared the other day.

    The two patterns are the front and back of the same paper and all the strips are the same size, just offset from each other. 

    The bird and sentiment are from a limited time Valentine’s Day set from Stampin’ Up called Love You More.  I actually bought it because it has a cool globe image, but I also loved this sentiment and the made with love stamp as well.  see…

    image It’s from the set of special valentine’s stamps and kits available through January 27th.  You can check them all out online here.

    But back to the card… Smile  you just color in the bird with your markers and punch out…then stamp and punch the sentiment.  I decided to add a little bling by glittering up the “love” and “more”.  Lots of scraps and this and that in this card!

    Everything I Used on the Card

    • Stamps – Love You More (available until Jan 27th)
    • Ink – Soft Suede, Real Red; markers: Soft Suede, Coastal Cabana, Soft Sky, Real Red
    • Paper – So Saffron cs, Whisper White cs,  Fresh Prints designer paper stack
    • Accessories – Dazzling Details, White gel pen, White Tea Lace doilies, Stampin’ Dimensionals, Sponge Daubers

    Alright, I was kind of brief… but I guess I’ll have to try harder next time I don’t want to be a jabber mouth!  Until then…

    spaced shop now sig bar

  • Spotlighting Paper Piercing for a Fab Blog Hop on Tools!

    Thank you so much for joining us for the September Stylin’  Stampin’ Squad Blog Hop! This month we are focusing on the tools of the stampin’ trade. Specifically, each of our favorite stamping tools. It’s amazing the kinds of tools that have been created to help us along in our paper-crafting addictions.  This month’s blog hop will showcase many of the Stampin’ Up! tools that are now available to us in the 2013-2014 Stampin’ Up! Idea Book and Holiday Catalog and even a couple of products that are so new they aren’t in either catalog. We hope you enjoy seeing how we use the old and new tools and are inspired to come up with some great projects of your own.
    You should have just left stop number 9 on the Stylin’ Stampin’ Squad blog hop – Stuck on Stampin’. If so, you are in the right spot. If a link doesn’t work or you get off track, you will find the full blog hop lineup below.


    Ok, so are you ready to see what I picked for my favorite tool?  I was going to pick punches (since, have you seen my wall of punches??) but that was well covered.  And so I decided to go with the less popular tool – the paper piercer and templates!

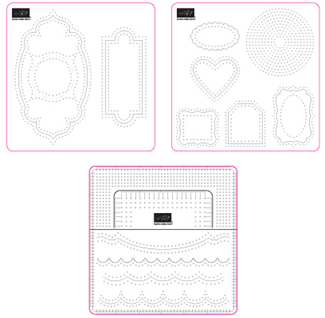
    I promise the picture above includes all three of the templates included in the Essentials pack, but its hard to see, so here is a better picture of all of the options available to you in the pack.

    image This is my absolute favorite pack because I cannot live without my straight rows of piercing holes.  It is the simplest thing, but I use it all the time!  Now, I love the shapes and patterns as well, and have found they give lots of possibilities even if you don’t own the coordinating punch or framelit.

    But to show you 3 of the ways I use my piercer, I created this card to share today:

    Can you spot all 3 uses of the piercing tool and template?  Smile  Keep reading to see if you caught them all!

    1.  Creating Faux Stitching

    One of the coolest techniques I know with this tool is the faux stitching technique and it is so easy to do as well.  Yes, you can pierce your holes and then grab needle and thread and stitch on your cards…. or you can just do this.

    Line up the more widely spaced straight line holes of your paper piercing template so that the seam between two pieces of paper (in this case, patterns from the Etcetera designer paper) is exactly in the middle between the two lines of holes.

    how to use a piercing template for faux stitchingUse your piercing tool to poke each hole and then draw your stitch lines in with your favorite color marker.  Looks pretty real, huh?

    2.  Spotlighting with Pierced Patterns

    Since there are so many patterns on the templates, sometimes they are perfect to coordinate with a punch or framelit for an extra accent.  In this case, I loved how the oval of holes helps accent the sentiment in the center of the scallop oval punch out.  You could do some faux stitching with this as well, but I thought the simple look was a bit nicer.

    You can also do this without needing to use a punch.  Use any of the shapes to accent a stamped image on any project you are working on.

    3.  Precision Placement of Brads

    how to line up piercing template for corners

    Ok, this is my go-to use for my paper piercer and template – placing brads.  I am a pretty loosey-goosey card maker and stamper.  I’m ok if my image is a little skewed (hey, its artistic that way!) and if I didn’t quite get that bow right.  But one thing I can’t stand, is if an element that is supposed to be symetrical – like brads in a row or in the corners of a paper – comes out slightly off.

    So I ALWAYS pull out my piercing template when I’m going to add brads to a project so I can make sure they are spaced evenly apart and the same distance in from each corner.

    To do that, you just align the black solid line on the template along the edge of your paper and then pick the same hole in the corner to use for placement.  Then just use the same corner of the template for each corner on your paper and you will get perfect corners every time!

    So, there you have it…. did you figure out all 3?

    I also wanted to take a quick moment to show one other little trick I did on this card…. yeah, it has nothing what so ever to do with piercing, but I thought it was cool.  It was how I got the doily for the background of the card.

    two tone sponging on paper doilies I took a single doily and folded it in not-quite-half.  Then I took a piece of scrap paper and placed it between the top and the bottom piece of the doily.  I sponged the top piece in Pool Party; then I opened it up and sponged the bottom side with Midnight Muse.  It gives a neat effect with no cutting and only one doily!

    and back to paper piercing…

    I did a class on Paper Piercing a while back and so I thought I’d share a card we made in that class that gives you even more ideas for how you can user the piercing tool and template.


    So I hope you enjoyed all the tips and ideas, and now are inspired to get out your piercing templates and start creating!

    For even more inspiration and ideas for using the tools you have at home, keep on hoping and visit Bree for some fun with the Simply Scored!

    Blog Hop Participants:

    1. Shellie G. of Craft Smashup
    2. Pam S. of Stampin’ in the Sun!
    3. Tonya B. of Stampin’ with Tonya
    4. Dawn S. of Dawn’s Creative Chalet
    5. Darcy J. of DJ’s Stampin’ Place
    6. Pamela W. of Stinky Tofu
    7. Kim R. of Stamping with Kim
    8. Justin K. of JK Cards
    9. Heidi B of Stuck on Stampin’
    10. Jennifer B. of NW Stamper <— YOU ARE HERE!
    11. Bree R. of Craft-somnia
    12. Diana E. of Stampin’ Fun with Diana
    13. Jennifer C. of Happy 2 Scrap 4 Life
    14. Jamie H. of Unique Ink
    15. Kristina M. of Mama’s Sanity

    spaced shop now sig bar

    Card Supplies Used
    Stamps- Express Yourself (hostess set)
    Ink- Midnight Muse, Calypso Coral, Pool Party
    Paper – Very Vanilla, Whisper White, Daffodil Delight, Etcetera designer paper
    Accessories – Paper piercer, piercing mat, Essentials Piercing Template, Scallop Oval punch, sponge daubers, white doilies, Mini Brads, stampin’ dimensionals

    Help me better plan future classes, online offerings, tutorials, and events –  take this quick survey on in-person and online class offerings and you’ll be entered to win!  Take the survey now!

  • Happy Birthday With A Cherry On Top

    Like other crafters out there, I’m sure, I have a huge pile of scraps that are more than just left over pieces of cardstock when I cut out a shape from a sheet.  But I have stamped images I decided not to use for one reason or another, punched images that I played with and set aside, and even card bases that I cut knowing they would be used sometime.  Well, I finally decided to do something about these random one-off pieces and started putting together some cards using them – including this card.

    This is a cute set called On a Pedestal that my mom got at one point that I just had to try out.  It is a “2 step stamping” set where you get a stamp of the pedestal and then different items you can layer on top, like a yummy cake with a cherry on top!  I grabbed this image and matted it and then started digging in my scraps for more pieces to go with it.  I had the Pixie Pink Top Note bigshot die cutout and the Happy Birthday stamped image (using the Create a Cupcake stamp set), so I layered them onto the River Rock card base.  When I was done, it still looked a little plain so I decided to try some faux stitching and grabbed my Signo white gel pen and added a little touch to the edge.

    What do you think of how it turned out? :) 

    Click here to shop online 24/7 and start earning your NW Stamper rewards!