Northwest Stamper

Tag: curvy keepsake die

  • One Week Left – Count It Down!  7 Days of Sale-a-Bration Ideas!

    One Week Left – Count It Down! 7 Days of Sale-a-Bration Ideas!

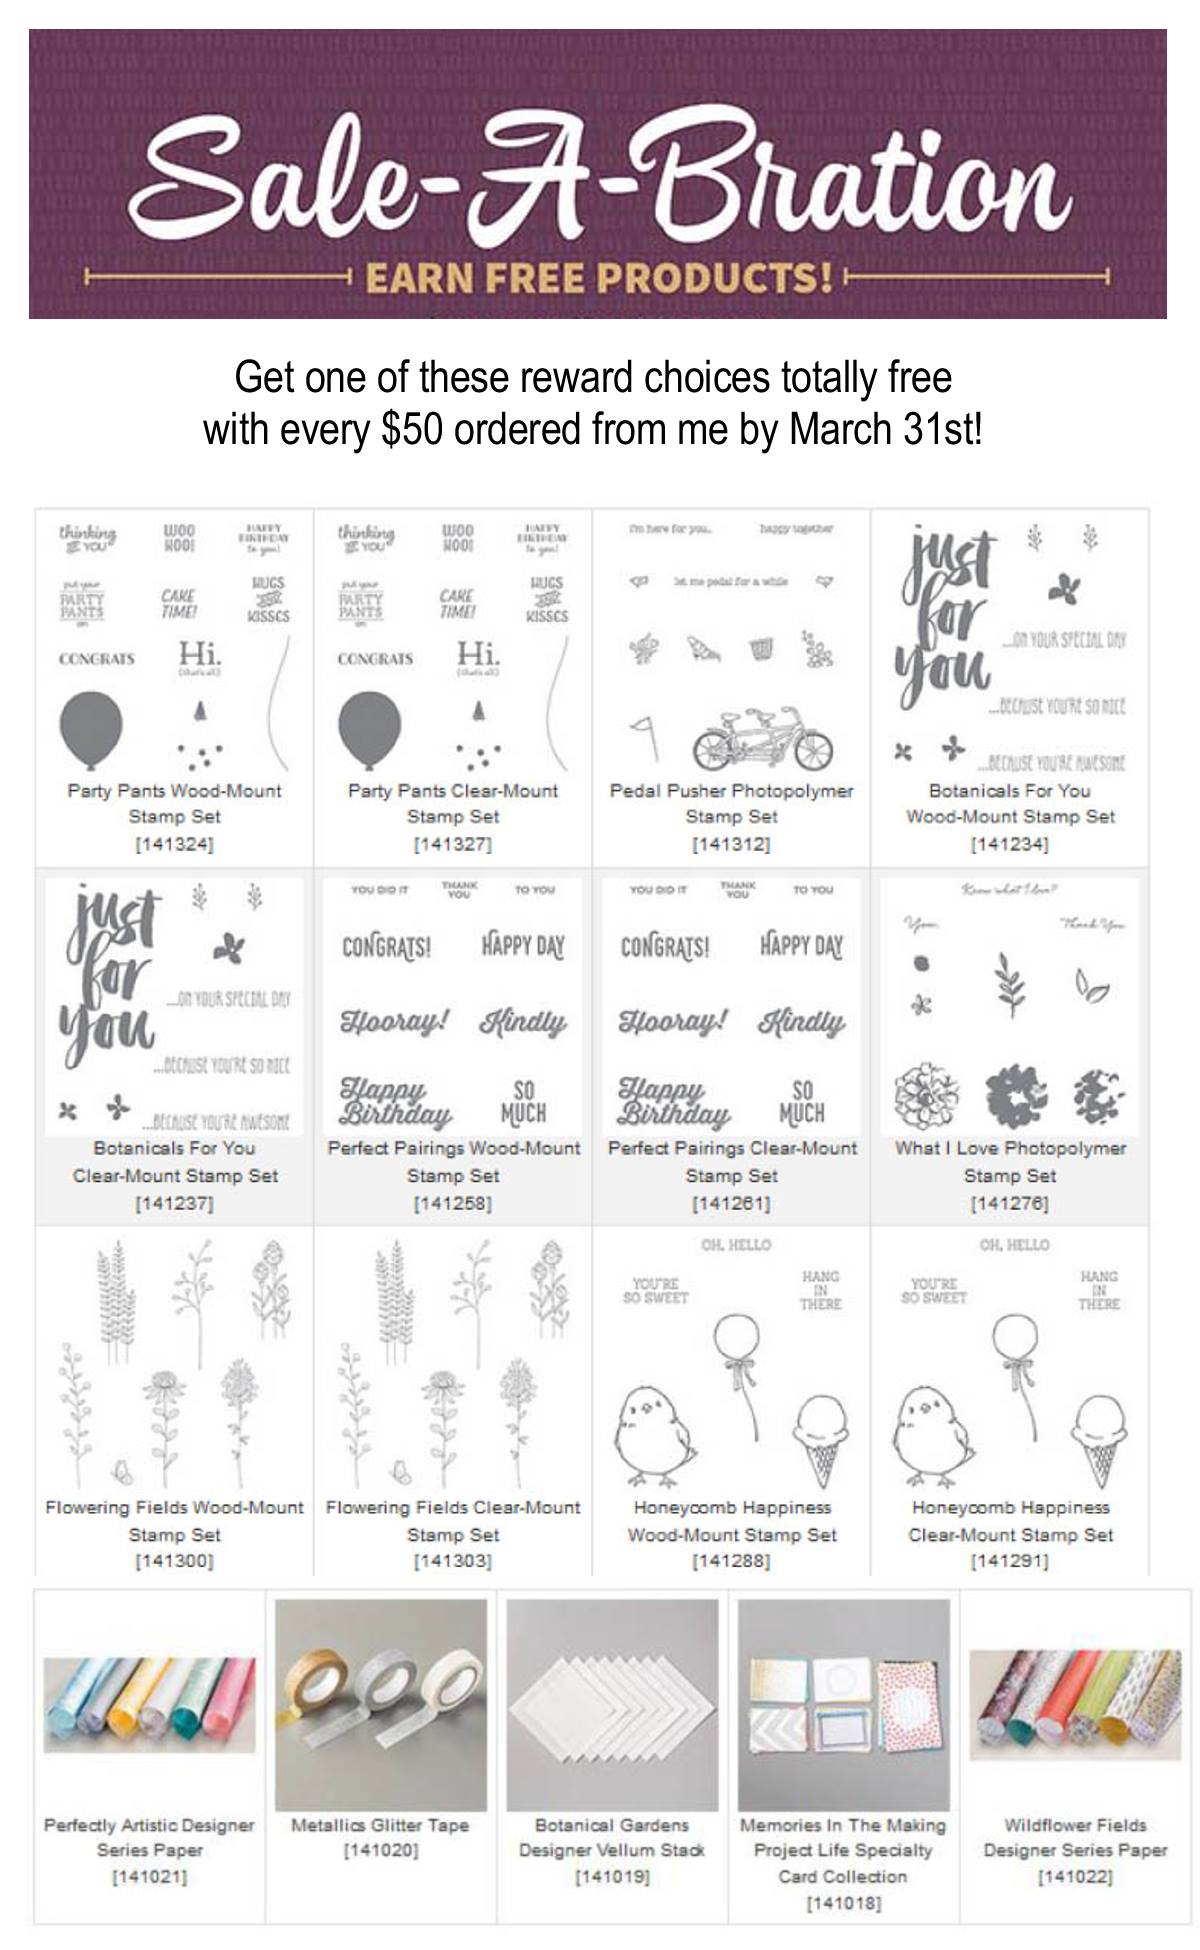
    If you can believe it, there are only 7 days left to score with Sale-a-Bration!  And to help count it down, each day I’ll be featuring one of the remaining exclusive items that you can only get this month as part of the promotion. Today we’ll be starting out with the Perfectly Artistic Designer Paper!

    Last week of Sale-a-bration meme

    Sale-a-Bration Scoop – All the Deals

    But first, just to make sure you have a reminder of all the ways your can save and score… here is the scoop:

    • Free stuff when you SHOP – for every $50 you spend, pick one of the items below to get for free! (get going in the Online Store)
      Sale-a-Bration free productsSee the full Sale-a-Bration Catalog & Bonus Flyer for more project ideas!
    • Extra hostess benefits for bigger orders – Put together an online party (I’ll give you a hostess code and you share with your friends and family, they order and their orders count towards your party!) or place a $250 order and you’ll get an EXTRA $25 to spend in free hostess benefits!  (Shop online or email me at jennifer@nwstamper.com)
    • Even more free stuff and free shipping when you JOIN – get the starter kit for only $99 and you’ll be joining my Fun n’ Crafty Stampers demonstrator group which is awesome all by itself, plus you’ll get an EXTRA $30 in free product of your choice (so $155 in product total) plus free shipping! (Pick your starter kit here)join the fun stampin up peeps

    Ok… got all that?  Now on to the fun stuff… PROJECT IDEAS!

    Sale-a-Bration Countdown-  7 Days Left!  Feat. Perfectly Artistic designer paper

    So I’m starting with the Perfectly Artistic designer paper today… since I’ve had some fun projects with this paper pack.  It is nice because it is great for backgrounds or just making a fun bunch of cards in different colors.  So, here are some ideas for you!

    Perfect for your punch art animal ears and feet Smile

    Easter Bunny Curvy Keepsake box with Perfectly Artistic Designer Paper

    (blog post for this project  |  video tutorial)

    Butterfly and Wink of Stella card with Perfectly Artistic designer paper

    (blog post here)


    Using up Perfectly Artistic designer paper scraps

    (blog post here)


    Embossing strips of Perfectly Artistic designer paper

    (blog post here)


    Lots of card variations with the Perfectly Artistic designer paper

    (blog post here)

    Shop online and get your pack of Perfectly Artistic designer paper FREE with a $50 order!  Get shopping – www.nwstamper.com/shop
    Steal the BIG deal and join our fun group – the Fun n’ Crafty Stampers!  Get started here – http://nwstamper.stampinup.net/jointhefun

    NWstamper signature_thumb[9]

    order online button for sig 3_thumb[4]

    ***Use Hostess Code MZ2REKD7 at check out to get a special thank you from me!***

  • Easter Bunny Box with the Curvy Keepsake Die (VIDEO TUTORIAL)

    As I was getting ready for my Stamp Club for March, my hostess asked for some cute Easter box or place setting.  Well… when it comes to cute animals and boxes, I knew just where to turn – the Curvy Keepsake Box!  I had made a bunny before, but as I was hopping around the interwebs, I found a cute variation by Wendy Lee and so I had to make some tweaks to my bunny and out came this Easter Bunny Box cutie!!

    Easter bunny box from the curvy keepsake die

    The best part is that it only takes the Curvy Keepsake die and a few punches to pull together this super adorable guy.  And if you want to see how it all comes together, just check out below because I have a video tutorial all ready to go for you!

    But what you will need to play along is:

    • The curvy keepsake thinlit die  (base)
    • Large Oval Punch  (insides of ears and feet)
    • Extra-Large Oval Punch  (ears and feet)
    • Owl Builder Punch  (cheeks, nose, eyes)
    • Fast Fuse adhesive
    • Stampin’ Dimensionals

    Curvy Keepsake Easter Bunny close up

    I also LOVED using the Perfectly Artistic designer paper (free for one more week with Sale-a-Bration, get it added to your order at no cost with any $50 order).  The watercolor wash side was super cute, but some folks in club used the marble side and it was awesome too!  Use that paper for the insides of the ears and feet… you are just layering your oval punches.

    Then glue the ears to the inside of the box flap so that you can open and close the box without hurting anything and you don’t see where the ears are glued on.  You just tuck them into the top slit of the box before gluing.

    Easter Bunny Curvy Keepsake Box Open

    And I just had to add a little bow over the ears with the 1/4” cotton ribbon in Blushing Bride to make my bunny extra cute. Smile

    Make It! – Curvy Keepsake Easter Bunny Box Video Tutorial

    If you want to see the video for this project, check out the VIDEO TUTORIAL below:

    (note – if you are reading this in email, click here to view the video)

    Curvy Keepsake Easter Bunny Treat Box

    Starting tomorrow!  The Final Week of Sale-a-Bration kicks off

    We are down to the final week of Sale-a-Bration if you can believe it!  I’ll be doing a countdown here on the blog and featuring a few more projects I haven’t posted before to remind you of all the cool projects you can make with the free choices during this great promotion.  Here is what is still available (all items are while supplies last) and I’ll be featuring most of them!

    Shop online and for every $50 pick one of these to get added for free!

    12901011_10207661677172460_561712037254347609_o (1)

    join the fun stampin up peeps

    Steal the deal and join our fun group – the Fun n’ Crafty Stampers!  Get started here – http://nwstamper.stampinup.net/jointhefun

    NWstamper signature_thumb[9]

    order online button for sig 3_thumb[4]

    ***Use Hostess Code MZ2REKD7 at check out to get a special thank you from me!***

    What I Used to Make This project
    (click any picture to get more product details)

  • Curvy Keepsake Easter Bunny Tutorial for the Fun n’ Crafty Blog Hop!

    Yay!  It’s time for another Blog Hop with the Fun n’ Crafty stampers, my lovely and talented downline that I’m blessed to have connected with and become friends with over the last few years!  (I told you SU is pretty awesome, right?)  Well, today we are doing our monthly blog hop a little bit early because we wanted to share with you some Easter ideas while you still had time to make them!  And while I had plans to make another card to show you, I got knocked out with a stomach bug over the last few days, so it was all I could do to get this little video tutorial filmed.  So I hope you like it!

    So here is my little bunny box for you.  I think I’m going to fill mine with jelly beans and put them in my kids Easter baskets this year – because that is what is so awesome about this, it is a treat box AND a cute decoration in one!

    I’ve also been making this in my card classes this month as a bonus project (I have one left coming up this Saturday if you are in the Seattle area Winking smile) and everyone have been having lots of fun with them and so I can vouch that ANYONE can make them.

    Tips for making this project:

    • When putting together your box and adhering your ears, make sure you are using VERY STRONG adhesive such as the Fast Fuse or Sticky Strip.  I wouldn’t trust snail or liquid glue to hold up over time.  In fact, my first couple boxes I made last year I used snail and they started popping apart a few weeks later.
    • I built my box first and then adhered all the punched elements – mostly with liquid glue.  I saved my inking with pen for last so I could see how it all had come together.
    • Here is a list of the punches used (see the supply list at the bottom of the page for pictures of each of these punches if you are more visual like me!)
      –  Extra Large Oval
      –  Large Oval
      –  Modern Label
      –  Owl Builder
      –  1/2” circle
      –  Mini treat back die
    • If you need any of these supplies, now is a great time to get them thanks to Sale-a-Bration!  For every $50 you spend, you’ll get to pick out something free… in fact, you can even pick out a refill for your Fast Fuse as a free item if you want!Check it out:  Original Sale-a-Braiton Items  |  March additions  |  Annual Catalog Choices

    I also put together a Video Tutorial for How to Make the Bunny– now the first few minutes are tips and tricks for the curvy keepsake box and then I start step by step walking through going from punches to bunny!

    (note – if you are reading this from email, you won’t see the video so click the link above)

    I’ll be back later with more fun Easter ideas but in the meantime, don’t wait!  Check out the great projects shared by these lovely ladies and don’t forget to give them some love along the way!
    **Blog hop starts at 7am PST on 3/25**

    Fun & Crafty Blog Hop

    Tobe B. of The Craft Sea

    Sarah G. of 1200 Some Miles

    Jennifer B. of Northwest Stamper <—YOU ARE HERE

    Pam W. of Stinky Tofu


    NWstamper signature_thumb[9]

    order online button for sig 3_thumb[4]

    Project Supplies Used:
    Easy shopping anytime!  Click the images below to see the item in the online store.

  • Elegant Gold Stamping with the Curvy Keepsake Box

    Wanna a peek at one of the boxes we’ll be making in my Too Cute Curvy Keepsake box class?  I had said that we would be making 4 boxes including one that was stamped… but when I went to go actually make the stamped box I stalled out.  I had wanted to use my Endless Wishes stamp set, but had forgotten I had loaned it to a downline member.  So I needed an alternate option and this is what I came up with:

    Turns out Mixed Bunch is a great substitute!  Especially when you use gold and Early Espresso.  Didn’t it turn out nice?

    I used the KRAFT cardstock – it is sturdier and a bit heavier than the Crumb Cake cardstock.  We’ll use Early Espresso ink and Encore Gold ink and then sponge with some Soft Suede ink.  But I really loved the extra touches to add to the bling – like the stamped sentiment which I stamped directly onto the Gold Foil sheets and then die cut out with the Starburst framelits.  Then add some gold sequins and 1/4” cotton ribbon to the top and you are set.

    I think these could be cute favors for events or just nice little gifts.  Can’t you imagine a pretty pile of these?  Smile

    If you would like to try out the fun boxes that you can make with this die, check out this fun class & class by mail I’m running tomorrow!  (Yes! You can still RSVP if you hurry)

    Tuesday 9/30 at 7pm, Panera in Redmond – RSVP here
    $15, save $5 with purchase of the Curvy Keepsake box die
    (Bonus kit – bring a friend and you both get to make the Turkey box for free!)
    Kit by mail option available!

    KIT BY MAIL – Get all the pieces precut and mailed to you in a kit to make all 4 boxes we make in class plus instructions for all of the boxes and the Turkey box!
    Cost is only $15+$3 shipping  (only $10 if you have purchased the die from me!)
    BONUS – have a friend sign up for the class too and I’ll include the Turkey kit for each of you!


    INSTRUCTIONS ONLY – Get access to the instructions for all 5 boxes so you can use your dies and punches at home to make these cute projects.
    Instructions will include all the dimensions, supplies used, and tips for making them as easy as possible!
    Cost is only $4.95  (that is only $1/box!)


    spaced shop now sig bar

    Hostess Code:  C2HYWWQM Use this Hostess Code and receive a free gift!
    (Please do not use the Hostess Code if your order is $150 or more)

    Project Supplies Used

  • Too Cute Thanksgiving Turkey with the Curvy Keepsake Box

    So, as I was getting ready for Stamp Club last week, I decided to make this super adorable turkey I had seen online from my friend Darla Roberts.  I was going to let everyone do the pumpkin I had made earlier as one of their projects, but wanted to show them a few different fun ideas with the Curvy Keepsake die.  

    No seriously… if you don’t have it yet…. you totally should get it!  Because look at this guy –

    Isn’t he the cutest?!?

    Tips for creating this box:

    • Use the Feather Framelit from the new holiday catalog to create a great fan of feathers for the tail.  I used the small feathers for the “front” of the tail and the larger feathers for the “back” of the tail.
    • When adhering the feathers for the back, I found it easiest to fan them out and glue them to a circle punch in the same color as the body (in this case, Chocolate Chip cardstock).  I adhered a circle to the front and back of the fan to help hold everything in place.

    • To make the face, use a small heart punch (like this one from the new Itty Bitty Accent Punch Pack) and cut the heart in half to make the wattle.
    • For the eyes, I used the large circles from the Owl Punch along with candy dots for the black parts.
    • I used the great fall color combination – Cajun Craze, Daffodil Delight, Blackberry Bliss, and Chocolate Chip

    I’ve been loving these boxes so much that I decided to have them as the focus of my class at the end of the month!

    Too Cute Curvy Keepsake Boxes Class

    If you would like to try out the fun boxes that you can make with this die, I have a few options for you!

    IN PERSON – Join me on Sept 30th at 7pm at the Panera in Redmond where you will get to make 4 different boxes
    (a stamped box, a penguin box, a light up box, and one more)
    Cost is only $15  (only $10 if you have purchased the Curvy Keepsake Die from me!)
    BONUS – bring a friend and both you and your friend will get the kit to make this Turkey box too!
    RSVP here

    KIT BY MAIL – Get all the pieces precut and mailed to you in a kit to make all 4 boxes we make in class plus instructions for all of the boxes and the Turkey box!
    Cost is only $15+$3 shipping  (only $10 if you have purchased the die from me!)
    BONUS – have a friend sign up for the class too and I’ll include the Turkey kit for each of you!


    INSTRUCTIONS ONLY – Get access to the instructions for all 5 boxes so you can use your dies and punches at home to make these cute projects.
    Instructions will include all the dimensions, supplies used, and tips for making them as easy as possible!
    Cost is only $4.95  (that is only $1/box!)


    Note – I don’t have the instructions quite ready yet because I’m finalizing the final project designs for the class.  But you will have the instructions no later than the 27th when I will be mailing out the kits for the classes by mail.

    I mean, because…. seriously, how much fun does this look to make? Smile 

    spaced shop now sig bar
    Hostess Code:  C2HYWWQM Use this Hostess Code and receive a free gift! (Please do not use the Hostess Code if your order is $150 or more)

    Need a Holiday Catalog?  Check it out online or email me at jennifer@nwstamper.com to get your copy!


    Supplies you will need for this project:

    Curvy Keepsake Box Thinlits Dies


    $32.95

    Feathers Framelits Dies


    $12.95

    Big Shot Die-Cut Machine


    $99.95

    Owl Punch


    $16.95

    Triangle Punch


    $15.95

    Neutrals Candy Dots


    $5.95

    Itty Bitty Accents Punch Pack


    $16.95

    Sticky Strip


    $6.95

  • Santa Boxes & More with the Curvy Keepsake Die

    With the Holiday Catalog released yesterday, one of the things that you find with any catalog are those products that you see and think, “eh, sure that is cute enough but I can’t imagine really using it”.  Well, I decided to go out on a limb and get one of those items – the Curvy Keepsake Box thinlit die.  I thought it looked kind of interesting but I didn’t know if I would use it… turns out, it is going to be one of my most used holiday catalog purchases!  So-many-cute-boxes-to-make!!!  All thanks for Lynn Starzl for getting me hooked on the possibilities including this box:

    This was the thank you gifts I made for my Stamp & Share event last weekend.  I gave them to each presenter and inside the box were little variety packs of embellishments from the Holiday Catalog plus the Dazzling Details bottle with a tag made from the Curvy Keepsake Box die and one of the new All is Calm Snowflake embellishments.  Here is what the die set looks like:

    Curvy Keepsake Box die

    Curvy Keepsake Box die set

    So when the Stylin’ Stampin’ Inkspiration girls did Friday Favorite’s today, I knew what I was going to pick!

    Tips for this project:

    • You will need to cut two pieces of cardstock to make these boxes, use Fast Fuze or Sticky Strip to adhere them together to make sure you don’t have your box falling apart later!
    • Do you embellishing and/or stamping on your box AFTER you cut out the shape but BEFORE you assemble your box
    • Tie your handles together with a box so it is easy to get into and out of the box without cutting or ripping anything
    • Use the magnetic platform to make sure your die doesn’t move when cutting out the box sides


    Holiday Weekend Special!

    ** All orders through 9/1 using the hostess code PA6NRD4S will receive a FREE project kit with all the supplies you need to make one of those Santa boxes plus a cute Pumpkin box as well!   Start shopping here **


    Want a sneak peek at what the pumpkin looks like?

    See!  I told you!  Totally cute and versatile.  And I have even more projects planned with this box and a class to go with it!  I’m not kidding there are a bunch of different ideas out there. Smile

    Oh!  And you see the sentiments on each of the tags?  That is using the new Good Greetings stamp set that is available as part of the new Host Promotion that runs now through the end of October. Get this stamp set for FREE and in addition to your regular hostess benefits.  Yup, totally free bonus stamp.  Whoop whoop.

    What do you need to do to get it?
    Get your friends together for a stamping night with qualifying orders, host a qualifying online Stampin’ Up party, get some friends and start a Stamp Club with me, or just place a $300 order and it is yours!  email me to get you started!

    Well, it is the kick off to the holiday weekend!  I hope you have a wonderful and safe Labor Day weekend.  I may be away from my email off and on throughout the weekend so if you email me me, know I will get back to you but it might take slightly longer than normal.

    spaced shop now sig bar

    Santa Box Supplies Used: