Northwest Stamper

Tag: create a cupcake

  • Pop Up Card in a Box featuring Create a Cupcake

    Pop Up Card in a Box featuring Create a Cupcake

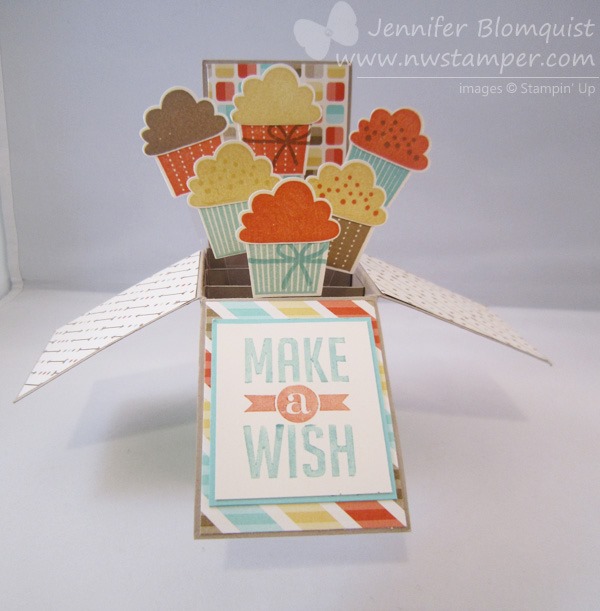
    The new Stampin’ up catalog is here and while I excitedly placed my first order from it yesterday, I thought I would show a few projects today and tomorrow that feature some fun ideas and products that are going away after tomorrow.  The first project (well both today and tomorrow) will be card in a box – just in two different sizes!

    This one features the Create a Cupcake stamp set that is retiring after tomorrow.  I’m a bit sad because I really like the sentiments that go with this set…. here is the sentiments I used from the set for the backside of the card.

    Now you may be thinking… how is this considered a CARD when it looks like a BOX?  Check it out, here is what it looks like in an envelope:

    Crazy, right?!  It totally fits!  That is the brilliance of this card design.  It folds down flat to be a mailable card but when the recipient pulls it out of the envelope it pops open to be a box with fun jiggly bits that can sit on their table or shelf.

    This is what it looks like when it is collapsed flat after they pull it out of their envelope.

    I thought my outside needed something which is why I added the Coastal Cabana cardstock with some stamping from the Perfect Pennants stamp set.  I also used that same set for the front “Make a Wish” sentiment too.  So happy this set at least is continuing on into the new catalog. Smile

    And if you like the cupcakes, (they really do make fun birthday cards)… or as one person said, muffins for her holiday baking.  You have two options right now:


    Create a Cupcake Stamp Set (retiring 6/4)~OR~  Cupcake Partyboth of which coordinate with the Cupcake Punch
    imageimageimage


    These cards aren’t hard to make, just time consuming to decorate if you get fancy.  Smile  I have to find my instructions for putting them together but I’ll post them TOMORROW if you want to stop back by to see the other horizontal design for this style of card.


    I’m getting ready to close my first Product Sampler / Product Share for the new catalog! If you are interested in samplers for the new designer papers or ribbon, make sure you let me know ASAP!  Details can be found here.

    spaced shop now sig bar

    June Online Stamp Club Hostess CodeACANDKB4
    Use this code to get free exclusive tutorials & project kit!  Learn more

  • Create a Cupcake Makes for a Bright Birthday

    When you are making a birthday card for someone, isn’t one of the top things on your mind all about making them smile?  Well, unless the birthday boy or girl hates cupcakes (is that even possible?!) I’m going to bet this one will bring a smile to their face!

    At least it does for me every time I pull out this card. Smile

    I designed this card for my technique class recently where we focused on paper piercing so I used the Essentials Paper Piercing Pack for the Decorative Label Punch shape around the outside of the punchout.  Then I used the rows of holes on the template to make even photo corners around each corner of the Whisper White cardstock.

    image

    Here is a close up of what I’m talking about:

    Plus, with the coordinating Cupcake punch, it makes it easy to get your cupcake together too.

    And speaking of birthdays, today is my Dad’s birthday!  I’m happy to be celebrating with him and my mom today and before we left to go visit, Nicholas decided to create a card just for Grandpa.  He picked out the stamp set, the colors, the punches, and where to glue everything down.  He may be 3, but he loves making cards for people too!

    2013-04-26 08.25.52


    To Order Stampin’ Up! Products Anytime, click here!

    See the Latest Availability & PDFs of all the retiring stamps and accessories here


    Supples Used
    Stamps
    – Create a Cupcake
    Paper – Whisper White, Crumb Cake, Real Red, Brights Family Designer Paper Stack**
    Ink – Chocolate Chip, Daffodil Delight
    Accessories – Essentials Paper Piercing Pack, Piercing Tool, Decorative Label Punch, Cupcake Punch, Stampin’ Dimensionals, 2-way Glue Pen
    **Items on the Retiring Stamps & Accessories List

    imageimage

  • Birthday Build-a-Blossom Card

    Does anyone else have a pile of scraps lying around?  Images stamped and even punched but then discarded as not right for your project?

    Well, I have a HUGE pile of those types of scraps lying around and so I decided it was time to either use them up or find a new home.  So, after a little digging, I came up with these Melon Mambo flower pieces from the Build-a-Blossom stamp set, the birthday sentiment already punched out, and the Whisper White scallop strip.  So, I started mixing and matching and suddenly the following card appeared!


    I know it is simple but I love how the simplicity lets the flower really stand out!  Oh and pearls, the flower was just begging me to give it some bling and so I just had to comply. 🙂


    Now, to just find more treasures in my scrap pile!  What can you find in yours?


    To Order Stampin’ Up! Products Anytime, click here!

    Are you earning your Northwest Stamper Rewards? Every order gets you closer to your FREE stamp set! Click here to learn more!

    Build-a-Blossom Birthday Card Recipe:

    Stamps: Build a Blossom, Create a Cupcake
    Ink: Melon Mambo Classic, Early Espresso Classic
    Paper: River Rock Cardstock, Old Olive CS, Whisper White CS
    Accessories: Blossom Petals Builder punch, Wide Oval punch, Basic Pearls, Basic Rhinestones, Scallop Edge punch, 1” circle punch, 1 1/4” circle punch, Stampin’ Dimensionals

  • It’s All About The Cupcake!

    Happy Saturday, everyone!  If you are a fan of my Facebook page, you’ve already seen today’s card; but I had so much fun making it that I wanted to make sure I shared it with my blog readers too.  (And it just makes me happy to look at so I’m having fun writing up this post!)

    I made this cupcake card when I was trying to come up with something that would be quick to make.  I had just gotten my Sweet Shoppe specialty designer paper and when I flipped to the cupcake pattern, I got inspired!

    One of the things I love about Stampin’ Up! is that since everything is color coordinated, I don’t have to think too hard.  In this case, I could just look at the paper pattern and just pull those exact same colors from my cardstock stash and start stamping and punching away to make a punched out version of the same cupcake.

    For both the cupcake base and the sentiment, I used the matching Create a Cupcake stamp set to go with the Cupcake Builder punch (have I mentioned how nice it is to have matching stamps and punches?).  Talk about quick!

    image         image

    Ok, now I think I want to make some cupcakes.  Yum!


    Don’t miss out on Sale-a-Bration – see what you can get FREE with your order!

    To Order Stampin’ Up! Products Anytime, click here!


    Punch Art Cupcake Birthday Card Recipe:
    Stamps: 
    Create a Cupcake
    Ink:  Soft Suede Classic
    Paper: Sweet Shoppe specialty designer paper, Calypso Coral CS, Pool Party CS, Soft Suede CS, Whisper White CS
    Accessories:  Cupcake builder punch, Stampin’ Dimensionals

  • Happy Birthday With A Cherry On Top

    Like other crafters out there, I’m sure, I have a huge pile of scraps that are more than just left over pieces of cardstock when I cut out a shape from a sheet.  But I have stamped images I decided not to use for one reason or another, punched images that I played with and set aside, and even card bases that I cut knowing they would be used sometime.  Well, I finally decided to do something about these random one-off pieces and started putting together some cards using them – including this card.

    This is a cute set called On a Pedestal that my mom got at one point that I just had to try out.  It is a “2 step stamping” set where you get a stamp of the pedestal and then different items you can layer on top, like a yummy cake with a cherry on top!  I grabbed this image and matted it and then started digging in my scraps for more pieces to go with it.  I had the Pixie Pink Top Note bigshot die cutout and the Happy Birthday stamped image (using the Create a Cupcake stamp set), so I layered them onto the River Rock card base.  When I was done, it still looked a little plain so I decided to try some faux stitching and grabbed my Signo white gel pen and added a little touch to the edge.

    What do you think of how it turned out? :) 

    Click here to shop online 24/7 and start earning your NW Stamper rewards!

  • Birthday Card Kit and Organizer

    Can I share with you this project that we are making in my Birthday Card Kit and Organizer class this weekend?  Isn’t it such a fun and cheery birthday collection?

    I had so much fun when I made this sample and I loved all the fun but simple ideas that we use on the different cards.  What you are seeing above is a fun desktop organizer with two storage compartments.  The front compartment is perfect for holding gift tags and 3×3 cards.  The top compartment is exactly right for holding standard sized cards and envelopes.  There is even a special spot for storing a coordinating pen!

    All of the pieces of this project use the fun Create a Cupcake stamp set and the Build a Cupcake punch.  In the class we’ll be making the box, the matching pen, 2 full sized cards (with envelopes), 4 3×3 cards (with envelopes), and 4 gift tags using this punch set, some of the chunky glitter, ribbon, and some extra punches.  I’m so looking forward to it because even though I know it is a lot, I know folks will enjoy and love having so many items ready for last minute birthday gifts and parties.

    If you are in the Bay Area and would like to come join us on Sunday afternoon for this class, let me know and I’d love to add you to the rsvp list!  Email me at jennifer@nwstamper.com.

    But, I know many of you are from all over the country and even around the world and I thought you might like to make one of these projects yourself.  So, I’m creating kits for you as well! These class kits include:

    • All the cardstock and designer paper precut and scored for the cards, pen, and box
    • Punched out pieces to complete all of the projects
    • Ribbon and fibers required for the projects
    • 2 standard sized envelopes and 4 small square envelopes
    • A pen ready for customizing
    • Instruction sheets for all included projects (so you can make them over and over and over again)
    • Shipping is included
    • All for only $25 shipped!  And let me tell you, you will be getting lots of pieces for these fun projects


    You just need some adhesive, glitter, and stamps as desired.  Due to Stampin’ Up! policy, I can’t prestamp any images for you but to help you out with that, if you get the kit and contact me to order any of the items not included in the kit, I will give you 10% off those items!  So, for example, you could get the stamp set and/or the chunky glitter at a discount!  I loved working on this project and I hope you do too!

    Click here to shop online 24/7