Northwest Stamper

Tag: card

  • New Card for a New Mini

    Friday night was my preview party for the new occasion mini.  I had samples of projects made using the new stamps and accessories from the Occasion mini as well as treats, a door prize, and this make and take card.  It gave everyone a chance to play with some of the new designer series papers, seam binding ribbon, and the vintage flower adornments.

    I’ll admit that Rose Red is one of my favorite Stampin’ Up! colors.  When they announced the color renovation last summer, I was so relieved to see that it was going to be sticking around.  So, when I saw the Occasions Mini and saw that they were offering new colors of seam binding ribbon and one of the colors was Rose Red, I was stoked!  I love how delicate the seam binding ribbon can look, perfect for a vintage feel.  Add some Botanical Gazette DSP and a little rose and you have an easy peasy vintagy card.

    Botanical Thank You Card Recipe:
    Stamps: 
    Curly Cute
    Ink:  Soft Suede
    Paper:  Crumb Cake CS, Very Vanilla CS, Botanical Gazette DSP 
    Accessories:  Vintage Flower Adornments, Rose Red Seam Binding ribbon, Glue Dots, Corner Rounder punch

  • The Occasion Mini is here

    Occasions11_USHave you had a chance to check out the Occasion Mini catalog yet?  This year I think they’ve done a great job of offering a wide range of stamps and accessories – from vintage to modern, masculine to sewing notions, plus NEW PUNCHES!!  I love punches, especially when they match stamp sets, so it was so fun to get to see a punch and matching stamp set for building a flower (it punches out the flower petals and leaves) and building a cupcake.  I still need to finish up the projects we started when my mom came to visit over the holidays but I can’t wait to share them with you as I do.

    But until then, I wanted to share a card that was posted on my demonstrator website.  It was created by Stampin’ Up! but just love how fun it is!  It uses some new stamps, paper, buttons, and pom pom ribbon.  These are from the Sew Suite collection and I love seeing how you can use them in fun modern ways. 

    So check out the mini and I’d love to hear what you think.  My favorite item right now is the Botanical Gazette designer paper.  What is your favorite?

    Friend Card Recipe:
    Stamps:
      Sew Suite, You’re a Gem
    Paper:  Daffodil Delight Card Stock, Early Espresso Card Stock, Melon Mambo Card Stock, Tangerine Tango Card Stock, Whisper White Card Stock, Sweet Stitches Designer Series Paper
    Ink: Early Espresso, Melon Mambo, Tangerine Tango
    Accessories: Daffodil Delight Pompom Trim, Melon Mambo Pompom Trim, Sweet Stitches Designer Big Buttons, Rhinestone Basic Jewels, Stampin’ Dimensionalsm Eyelet Border Punch, Itty Bitty Shapes Punch Pack, White crochet thread

  • A Big Button Petal Pizzazz

    This month’s make & take project had me focused on using the Big Designer Buttons from the holiday mini.  I didn’t know what else I wanted to do with a card, but I knew I wanted to use my buttons.

    So, after digging through my stamp sets, I ended up finding my Petal Pizazz set and realized that the buttons were a perfect fit for the biggest flower in the set.  So, I started from there.  My other challenge for this card was to not use any punches.  I love my punches and so I use them on almost every card…but this just goes to show, you don’t have to use a punch to make a fun card.

    If you like these buttons, don’t miss them.  These color sets (which match the Candy Cane DSP and Designer Fabric, and the Deck the Halls DSP and Designer Fabric) are only available in the Holiday Mini which lasts until January 3rd.

    Thinking of You Recipe:
    Stamps:
    Petal Pizazz, Teeny Tiny Wishes
    Ink: Blushing Bride, Early Espresso Marker
    Paper: Whisper White CS, Pear Pizazz CS, Blushing Bride DSP (hostess)
    Accessories: Candy Cane Big Designer Buttons, Paper Piercer, Mat Pack

  • Would You Guess This Was a Birthday Card?

    Usually having stamps come in a set is a good thing because you know you have a variety of images and words that will coordinate and can give you a number of design options or even project options to work with.  However, in this case, I learned that it can also influence you, the stamper, in ways that aren’t so obvious to the viewer of your project.  Smile

    This card uses the stamp set Birthday Bakery (a hostess set) and so when I was creating this card I totally had it set in my head that this is a birthday card.  Well, I got it all finished and my friend took a look at it and had no clue it was a birthday card!  I was about to say,” Of course it’s a birthday card!” but then I looked at the sentiment again and realized that just because I had a gift bag didn’t necessarily imply birthday.  So, instead, this could work for any number of reasons. 

    Now to decide what my reason should be…..

    Eat Something Cute Recipe:
    Stamps: 
    Birthday Bakery
    Ink:  Basic Black, Pink Pirouette marker, Cherry Cobbler marker, Rich Razzleberry marker, So Saffron marker
    Paper:  Jolly Holiday DSP, So Saffron CS, Whisper White CS
    Accessories:  Basic Black 1/4” ribbon, Stampin’ Dimensionals

  • A CASE’d Hello from Conventions Past

    Today I thought I’d share a card that is a direct CASE of a card we made at Convention in 2009.  I was asked yesterday if I came up with my project designs on my own or find them from somewhere else.  The answer is both.  And often I look at projects I’ve created in the past and switch up the colors or embellishments to suit what I have on hand at the time.  This is one of those examples. 

    So, here is the card we made at convention:


    And so I switched out the Crushed Curry base and ribbon for Old Olive.  Used Melon Mambo, So Saffron, and Soft Suede markers; and added some of the adhesive rhinestone bling to create this version:

    It’s a bit more subdued than the first version but I like it just as much.  I think it’s also a great card to do at a workshop too.  If you are in the San Francisco Bay Area, I’d love to show you and your friends how to make this card for free.  Send me an email and we’ll pick a fun day for at girls night in!

    Until then, Happy Stamping!

  • Happy Thanksgiving!!

    I wanted to take a moment to wish you all a very Happy Thanksgiving!

    I am so thankful for my family, friends, and the wonderful community of crafters I have had the privilege of becoming a part of since discovering stamping and Stampin’ Up!

    And I am thankful for all of YOU!  Your comments, encouragement, and visits to my blog really bring joy to my life.  So thank you.!

    So, as you enjoy a meal with family and friends today, I wish you the best and remind you to enjoy and be thankful for all the people and wonderful little things in life. 🙂

    Thanksgiving 2010-001

  • One More Summer Card–Just for You

    Ever have a project that you see in your head…you start cutting/stamping/punching and then suddenly go “that doesn’t work”?  That is what happened to me on Monday.  I wanted to get in one last farewell to the Summer mini card and was thinking how I got the Bouquet Bunch stamp set because I loved the squirrel and then ended up using just about every stamp in the set but the squirrel.

    So I had a vision in my head, and proceeded to stamp and punch 6 squirrels and matching dsp.  Then I laid it out and….bleah!  Then my 8 mo old wanted my attention, and you know how life goes.  So, today, I got my new holiday mini order in the mail and OH MY!  I was so excited to start playing (I CAN”T WAIT to use my new big buttons!) but when I sat down, my half done card was staring at me and I just had to finish it.  So, after some fiddling, this is what I came up with.

    I used the retiring Travel Journal DSP and on the left edge stamped the tree leaves from the Bouquet Bunch set (stamped off once before stamping on the card) to make the background.  As I was tweaking, I decided it would be fun to have the squirrel on the right be actually peeking through a hole from the inside of the card.  So that is what you can see here:

      I added the green for a touch of color and then the soft suede ribbon.  It still needed something so a scrap of linen thread finished it off. 

    I loved this sentiment from the new hostess set Afterthoughts.  It seemed appropriate somehow with all the squirrels running around.

    Finally, if you know me, you know I’m a terrible hoarder of scraps.  The thinnest strip of paper or a scrap that “I could totally get at least one punch out of” seems to make it in my scrap folder.  So, when I was done and I had one squirrel left, plus the dsp and cardstock from punching the hole in the front of the card… well, I couldn’t throw them away!  But I need to use up my scraps so they became a perfect little button to hide the seam where I glued down the ribbon on the inside of the card.  I think it works.  Don’t you agree?

    Ok, with that done, I can now dig into my new goodies guilt free.  So, watch for some new stuff showing up on my blog this weekend!  Till then…. happy stamping!

  • An Owl Punch Flower Pendant Card

    When I was visiting my mom last week, we got a chance to try out some different stamps and punches.  (One of the fun things of having an upline/downline – you can share stamps and products so you can try them out without having to buy everything yourself).  One of the items she had just received was the new Owl Punch.  This punch makes really cute cards – like this one that was shown at convention 2010.

    But one of the other things you can do with it is make other neat punch art like bats and even a flower.  So, we decided to try out making a flower with the punch and once I had the flower, I then built a simple card to use it with.  We use the description found on the blog Flowerbug’s Inkspot to create the flower.  Her blog has a great description and photos but here is the quick version: 
    Start by punching out 7 owls.  Take the main body of the owl from the punch and trim off the legs.  Then you fold the body in half so you have a centerline.  Fold the rounded bottom part of the owl in towards the center line so it looks kind of like a pie wedge.  Trim a curved lines starting from the point of the ears into the center line to make the white petals you see below.  Then glue the 7 pieces to a base piece of paper in a circle to make the flower.  I then added a vintage tag to the center and pierced two holes in the base cardstock to run the string through.  This allows the flower to swing like a pendant.

    If you’ve found other fun ways to use this punch, I’d love to see them.  Leave a comment with a link to your blog or site with the sample and I’ll check it out!

    Recipe:
    Stamps:  Watercolor Trio
    Ink:  Elegant Eggplant
    Paper:  In Color DSP – Peach Parfait (Hostess), Crumb Cake CS, Very Vanilla CS
    Accessories:  Owl Punch, Lg Scallop Circle Punch, Baja Breeze double stitched ribbon, vintage tag, Adhesive Pearls, Paper Piercer.

  • Punch Art Flower for my August Meetup

    Yesterday was the August meet and greet for my Meetup group here in the Bay Area.  A few of us got together and had some pie at Marie Callender’s and I brought a free make and take for everyone to do.  This month I decided to do some punch art and so I modified a past card I had made to use some new stamps and colors and came up with this card.

    This was an easy card that used 7 punches in all, though you could modify this card to use fewer punches or more stamps.  Here are the steps to create it yourself:

    1. Punch the base of the flower using the extra large Fancy Flower punch
    2. Stamp the five petal flower image from Punched Posies hostess set, once on colored cardstock and once on white cardstock
    3. Punch out stamped images using the Five Petal punch
    4. Stamp the smaller six petal flower image from the Punched Posies hostess set on white cardstock and punch out the center using 1/2” Circle punch
    5. Layer these punched images together and glue
    6. Punch the leaf using the Small Oval punch
    7. Fold the oval in half and trim one side to form a point
    8. Stamp the vase using one of the ornament images from the Delightful Decorations stamp set on white cardstock
    9. Punch out using the ornament punch and trim the bottom of the ornament to form the flat base of the vase
    10. Stamp the sentiment from the Because I Care hostess set on white cardstock
    11. Punch out sentiment using the Large Oval punch
    12. Punch corners of base white cardstock with the Ticket Corner punch
    13. Stamp the stem using the stem image from the Punched Posies stamp set on base white cardstock
    14. Glue down onto your card base and your done!

    Punched Flower Recipe:
    Stamps: Punched Posies, Delightful Decorations, Because I Care
    Ink: Poppy Parade, Daffodil Delight, Old Olive
    Paper:  Old Olive CS, Whisper White CS, Poppy Parade CS, Daffodil Delight CS
    Accessories:  Fancy Flower punch, Five Petal punch, 1/2” circle punch, Ornament punch, Ticket Corner punch, Small Oval punch, Large Oval punch

  • Stampin’ Up! Convention 2010 – Swaps, Parties, and a Baby!

    I’m back from a trip to Salt Lake City for the 2010 Stampin’ Up! convention with my Mom and upline, Kathy, my dad, and my son.  I love the chance to go meet other demonstrators, including folks whose names I’ve seen on emails but now I got to meet in person, hang out with friends, get super cute stuff, swap gorgeous cards, and generally get pumped about Stampin’ Up!  I have way too many photos to share all of them in one post so I’ll be posting pictures in future posts as well.  But for now, here are some of my highlights.

    Before convention even got started, mom and I participated in two days of preconvention stamp camps and swaps with Late Night Stampers

    IMG_0819 Then came Wednesday – Check in day.  This is the day that everyone lines up in the early morning for a chance to be one of the first to get into Memento Mall (the SU convention gift shop).   My dad was kind enough to go get in line when he got up around 6:15am and he wasn’t the first in line!  By 7:30 the line was around the block. :)  checkin day line photoBut unlike Disneyland, its fun to stand in line at convention.  Everyone is swapping and I even saw a friend of mine from Portland (Hi, Liz!) and got a chance to introduce her to Nicholas. IMG_0856

    After we swapped, checked in and got our free stamps and bag, we relaxed before meeting up for a group photo and swap with our upline group – the SBStampers.  It was there that Nicholas got his very first swap.   He loved playing with this fabric squeaky toy made by Charity Lawson using the Scallop Square die for the BigShot and a squeak toy from a pet supply store.IMG_0871IMG_0873 

    Later we got dressed up in our grooviest attire for the Flower Power party.  Sadly, I missed getting my face painted by SU illustrators but I did participate in some fun games.
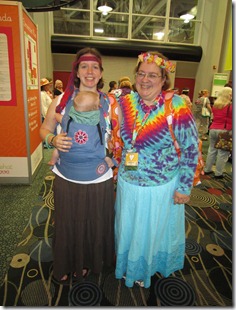
    IMG_0876

    That was only the beginning of a fun weekend.  Here is one of the swaps I created to trade with folks over the course of the weekend.  The flower is made using the Flower Fusion sizzlit that in one tiny little die cuts out 3 flowers of different sizes.  I then folded up the petals and stacked them using glue dots.  It really does pop off the page, which I thought was fun and cool.  I think you could step it up a notch even more by adding a pearl or rhinestone to the center of the flower.  I would have done it but I ran out of time.  But still, i like how it turned out and folks seemed to as well. Flower Fusion Swap Card

    I have to say, I love all the cards I got swapped and will be showcasing come of my favorites in a future post so you can see these great ideas too.  More photos and swaps to come!  Until then… Happy Stamping!

    Convention 2010 Thank You swap card:
    Stamps: Because I Care (hostess set)
    Inks:  Concord Crush classic ink
    Paper:  Basic Black CS, Whisper White CS, Pear Pizzazz CS, Concord Crush CS, Play Date DSP
    Accessories:  Polka Dot Impression Folder, Flower Fusion sizzlit, Little Leaves sizzlit, glue dots.

  • Trying out the BigShot – a card, a box, and the matchbox

    I wanted to put up a quick post before I had to run into work.  This week has gone by so fast and has seemed so busy, but the rest of the week should be more relaxing.  On Tuesday, I was hosting a Technique Night focused on using the BigShot.  Unfortunately, that night I had some folks cancel because of illness, unexpected time conflicts, delays, and getting lost, so it ended up not happening.   One the upside, my friend Jennifer recently decided she wanted to make a baby book for her daughter but had been overwhelmed by where to get started.  So, since she had come over, I helped her figure out what she needed.  She ended up deciding to get the Stampin Up! Baby Girl simply scrappin kit, and after looking at it more closely, I can’t wait for her to get it because I think it is going to be so stinking cute.  Then last night we went to Michaels and picked out an album to go with it.  So, I’m feeling good that we got something productive done. 


    So, since the Technique Night didn’t happen this week, I rescheduled it for next Tuesday.  I’m trying something different this time.  I created a meetup group called Portland Card Makers recently and since some of those folks were going to come, I thought I would try out a public location that most people could easily get to and find parking.  So, I ended up finding a Round Table pizza that had side sections with long tables that you could reserve for free.  It may seem odd crafting in a pizza place, but I’ve been to an event at a Fuddrucker’s so, hopefully this will work out.  I guess we’ll see!


    Here are some samples I was playing with for the BigShot.  The first is a card using the Top Note die.  It was an interesting and different way to create a card since the inside of the card is the inside of the Top Note die.  Then, I was going to do a box/basket using the Scallop Envelope die and some ribbon.  The last thing we were going to do at the technique night was a card using texture plates and an embosslit but I’m reworking that card right now.  And then finally I thought I would share a box I made with the new Matchbox die.  It was sooo easy to make since everything is cut and scored for you.  You only need to use one piece of sticky strip or snail and its together!  Plus the die punches out the label that I stamped and put on top.  Easy peasy.


    bs_technight_wmbs_matchbook_wm

  • Thank you Stampin’ secret sister!

    april_ss_wm1  One of the wonderful ladies in my stamping group decided to organize a secret sister group.  When you signed up for this group, you agreed to send your secret sister a handstamped item plus anything additional you want to send.   We were supposed to send out our first gift by the end of March and boy did that deadline come up faster than I think most of us expected!  I know it did for me. 🙂 


    Yesterday, I got home from work and had this very cute card waiting for me in my mail box.  She used the Manhattan Flower die for the BigShot to make this simple yet cute card.  And then, she included a movie pass, which with the skyrocketing movie ticket prices is very generous. She knew I liked movies, so now I just have to decide what movie to use it for.  Anyone have any recommendations?


    Thanks, Secret Sister!