Northwest Stamper

Tag: bitty butterfly punch

  • Cute Collage Stamping using Kinda Eclectic

    Cute Collage Stamping using Kinda Eclectic

    Today I wanted to share a card I created to send out as part of my customer thank yous.  I had gotten embarrassingly far behind on sending out thank you cards for orders over the last few months and so I wanted to make up some cards and make sure everyone knew how much I appreciated them and their support.  It took a while but it was great to sit and write a little note to each person.  Plus it was fun to take a big stack to the post office… say HAPPY MAIL!  🙂

    Happy mail - customer thank you cards in the mail

    So what is inside many of those cards?  This fun Kinda Eclectic collaged thank you card!  I have always loved the Kinda Eclectic stamp set because it is one of those sets that you can just randomly stamp a bunch of the images onto a piece of cardstock and it almost always looks great.  Gotta love stamp sets that make it hard for you to mess things up!

    Kinda Eclectic Collaged Thank You Card side view

    Now this card was also a last hurrah for me for many of the retiring items from the Stampin’ Up 2016-2017 retirement list (You can see everything that is still available and being discontinued here).  Including:

    • the Kinda Eclectic stamp set
    • Cucumber Crush Thick Baker’s Twine
    • Cucumber Crush cardstock
    • Cucumber Crush ink
    • Tip Top Taupe ink
    • Bitty Butterfly punch
    • Elegant Butterfly punch
      Kinda Eclectic Collaged Thank You Card with butterfly punches

    Yes… I’m still in a bit of shock that Stampin’ Up is retiring the butterfly punches!  They are so cute and look so great layered together!

    Tips for making this Kinda Eclectic collage card:

    This card is a lot easier to make than it may seem, so here are a few quick tips for making it.

    • Have fun with the leaves to fill in the corners!  I stamped the leaves in Cucumber Crush ink on the corners of the card base.  Then I used Memento Black to stamp ONCE full strength in the corner of the white cardstock and then I stamped AGAIN without REINKING just offset from the first black image so you get the faded layered look.
    • The two butterfly images come from the Kinda Eclectic stamp set.  Stamp the large butterfly full strength and punch out.  Stamp the smaller butterfly once on scrap paper and then again without reinking the stamp onto your cardstock scrap and punch it out with the Bitty Butterfly stamp.  Both of the butterfly images below were stamped using Tip Top Taupe ink.
    • Use glue dots to hold your butterflies together – I love using glue dots to adhere my butterflies.  I use one dot in the center of each butterfly.  This holds my punch out down firmly, but still lets me fold up the wings so it looks like it is trying to fly away.
    • Make a tiny matting border for a crisp way to break up your layers – I love using this type of small mat.  It is 1/8″ larger in each direction than the Whisper White cardstock.  Now, I mailed off all my copies of this card without measuring, but I think it is approximately 3 3/4″ x 5″ for the Whisper White cardstock and then 3 7/8″ x 5 1/8″ for the Basic Black cardstock.
      Kinda Eclectic Collaged Thank You Card nt

    Want to make this card at home? Here are the project supplies:  

    NWstamper signature_thumb[9]

    order online button for sig 3_thumb[4]


  • A Kinda Eclectic Convention Display Board Sample

    How about another quick share using the oh so pretty Kinda Eclectic stamp set?  This was another card I created for Convention last year and I realized I hadn’t shared it yet.

    It was one of those “a little bit of this and that” cards and so there were lots of fun little touches.

    Tips for this card:

    • Stamp the sunburst image in Crumb Cake onto a piece of scrap paper.  Then I heat embossed the image with clear embossing powder by inking up the stamp again with Versamark and stamping on top of the Crumb Cake image.  After heat embossing you can sponge over the embossed lines with So Saffron ink to make a soft sun background.
    • Use the Starburst Framelits to cut out your sun image for a different textured edge
      (Save 25% off these framelits through Monday 1/19 with the weekly deals!)

    • Use the Bitty Butterfly Punch and the Elegant Butterfly Punch to create your layered butterflies.
    • Create your own background by using the rows of dots stamp from the Kinda Eclectic stamp set and off set each row.  I used different colors of inks to further mix it up!

    You’re Invited!  It’s a Sale-a-Bration Celebration!

    Come to a very special event where I will spoil you! Sweet treats, specials, sneak peeks, stamping make n takes, gifts, games, prizes and more!

    FREE! You can only EARN your way in!  Here is how:

    1. Spend at least 150.00 during the months of Saleabration! (Jan.-March)
    2. Host a Saleabration workshop, Private Class, or online party!  (Hostesses earn 25.00 MORE for FREE! *must be min. 250 in sales)
    3. BEST DEAL – Purchase the Starter Kit  (Get 2 FREE Saleabration choices! Or a Project Kit!)

    Monday, April 20th. (If you qualify and can’t attend, I will mail you the make n takes and gifts that will be passed out!)  This is something new I’m doing this year and I can’t wait to start planning all the fun for this event!

    NWstamper signature_thumb[9]

    order online button for sig 3_thumb[4]

    Project Supplies Used:
    (if you are reading this in email, click here to see the list of supplies)

  • Spinning Butterfly Flip Card for Class

    Spinning Butterfly Flip Card for Class

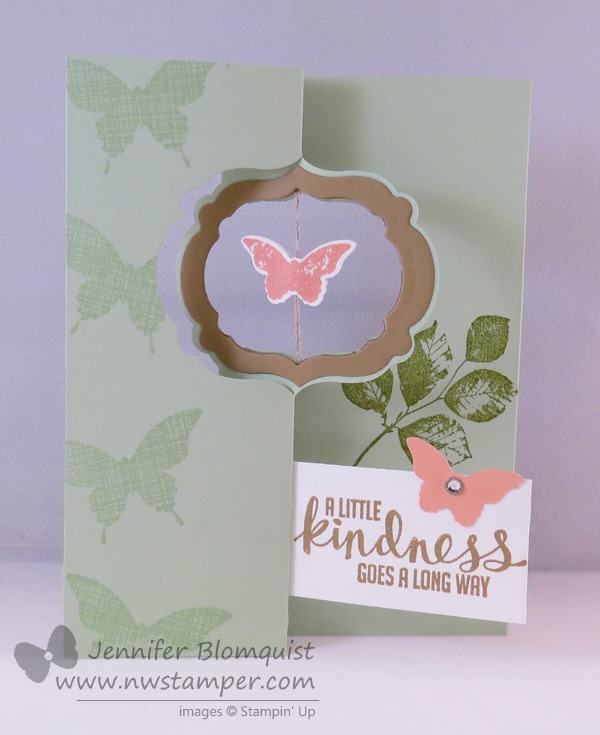
    Have I mentioned how excited I am for class tomorrow night?  I am running my Beyond the Basic Flip Card class and showcasing some different variations on the Label and Circle Thinlit flip cards.  I thought today I would share one of the cards that they will be doing in class, so hopefully it will give you some inspiration as well!

    I had seen cards with the center circle punched out and a spinning element, and so I thought I would give it a go with the Label Thinlit.  Turns out the Bitty Butterfly punch is a perfect fit  to go inside! 

    All it takes is using the smallest label framelit (from the Label Framelit collection) to punch a hole in the center flip piece of the card and in a piece of contrasting cardstock (in this case – Baked Brown Sugar) and then using the label framelit that comes as an accessory to the Label Thinlit flip card die to cut around your Baked Brown Sugar hole to make a cute frame.  Add your spinning element to the middle with floss or linen thread (which is what I did)  and decorate!

    For my inside, I wanted to make sure I had room to write a note to the recipient of my card, and so I used a flap of whisper white cardstock to place my sentiment on the front, and to cover up a place for me to write on the inside of my card.

    It turns out really cute in person – its just really hard to photograph! Smile  Plus, with the framelit and thinlit dies, it makes it super quick and easy to put together too!

    Stampin’ Up Supplies Used

    This is another one of those dies/tools that the more you start using it, the more ideas start flowing (at least they did with me).  So, start playing and trying out all the combinations you can come up with with all the extra dies they include in the pack.  And if you want more ideas – you are invited to join me for my class tomorrow night (just please RSVP so I know your coming) or I’ll be putting together an online class soon with videos and pdf details and more soon! 

    spaced shop now sig bar

    June Online Stamp Club Hostess CodeACANDKB4
    Use this code to get free exclusive tutorials & project kit!  Learn more

  • A Sweet Card with an Envelope Full of Butterflies

    A Sweet Card with an Envelope Full of Butterflies

    Happy Sunday to you!  Today I have one of those cards to share that is a little bit of this and a little bit of that from around your craft room.  But in the end doesn’t it turn out to be such a sweet card?

    I had seen a photo of a card that had the idea of an envelope with lots of butterflies flying out from that and so I tried to capture that with the supplies I had at home.  So I started out with my Strawberry Slush cardbase and had to add a bit of texture and so I pulled out my much under-used embossing folder – the Fancy Fan embossing folder.  Then I layered on a strip of Smoky Slate cardstock edged with the Scallop Edge border punch and a piece of the Gingham Garden washi tape.  Again… why don’t I use washi tape more often??  It is so stinkin’ easy and so cute on your projects.

    Finally, the center piece of the card!  I created my own envelope using one of the smallest dimensions on the Envelope Punch BoardSee?  It isn’t just for envelopes for your card!  Put your envelope together, punch out a variety of butterflies and glue them on to look like they are exploding out of the envelope.  Not hard to put together but think of how much of a smile this will bring to someone’s face when they get it from you!  Smile  See, I’m smiling just thinking of mailing it out. 

    Have a wonderful Sunday! 

    spaced shop now sig bar

    April Online Stamp Club Hostess CodeG4VQJ7VB
    Use this code to get free exclusive tutorials & project kit! Learn more

    Stampin’ Up! Supplies Used
    Stamps – Hip Notes
    Ink – Markers (Strawberry Slush, Basic Grey)
    Paper –Strawberry Slush, Smoky Slate, Very Vanilla, Whisper White, Pink Pirouette Designer Paper
    Accessories – Word Window punch, Gingham Garden washi tape, Elegant Butterfly punch, Bitty Butterfly punch, Big Shot, Fancy Fan embossing folder, Scalloped Edge Border punch, Envelope Punch board

    Favorite products:

    134820s
    127821s
    132140s
    117273s
    132622s
    132622s
    132622s
  • Background of Butterflies using Wheel Stamps

    Today’s card share is an idea for how to use your wheel stamps.  It is a simple idea and just involves using a jumbo wheel to create a background for your card.  Hope you like butterflies!

    In this case, I wanted to use the Butterfly Collection Jumbo Wheel.  I thought it would be a great set of images for the background of a card.  Here is what the wheel looks like:

    image

    So, to cover the entire front of my card, you only have to roll the wheel twice!  Not too hard, huh?  I used the same color ink as my cardstock to let you see the butterflies without it being too busy.  If you wanted it even subtler, then I would use Versamark as your ink.

    Wheel Stamp Techniques:

    1. Start rolling your wheel before you get to your paper where you want the stamp to show up.  This headstart makes sure you are getting the right pressure and direction that you want.
    2. Ink up your wheel using ink pads for more color options.  Ink them up by rolling in one direction, like you were inking up a paint roller for your home.
    3. Use a thick plastic ruler to help guide your wheel when doing a second pass so you keep it going the direction you want it to go.

    Want to see what I mean and more tips for Wheel Stamping?  I have a video on Wheel Stamp basics to talk about the different types of wheels and share a number of tips for successful stamping.  (if you are reading this in email, click here to see the blog post with the embedded video)

    Stampin’ Supplies used

    Stamps – Butterfly Collection jumbo wheel, Oh Hello
    Ink – Wisteria Wonder, Primrose Petals, Chocolate Chip, Pear Pizzazz
    Paper – Wisteria Wonder, Whisper White
    Accessories- Corner Rounder punch, Bitty Butterfly Punch, Crushed Curry Chevron ribbon, Stampin’ Dimensionals, Pearl basics

    Order any of the supplies and more in my online store

    I’ll admit wheels are a bit neglected in my stamp collection, but they can be a lot of fun to use and perfect for the job.  So, grab your wheels and give them another go!

    spaced shop now sig bar

  • Last Chance to Save on the Bitty Butterfly Punch & Stamps

    I just wanted to make sure everyone realized that TODAY was the LAST DAY to get the Bitty Butterfly punch and coordinating Papillion Potpourri stamp set for 15% off!

    image


    So if you’ve been thinking of either this punch or stamp set, don’t miss out on your chance to save!

    Get this bundle now in my online store!
    Available in Wood Mount stamps & Clear Mount stamps


    To Order Stampin’ Up! Products Anytime, click here!

  • Sale-a-Bration Send Off: Bloomin’ Marvelous

    Yesterday I shared some ideas for the Patterned Occasions stamp set and so today we are on to our next set – Bloomin’ Marvelous!

    image

    I’ll admit, this is a stamp set that I wasn’t too excited about when I first saw it.  I thought the sentiments were cute but the images were just eh.

    Well, then I started seeing the samples and I had a total change of heart!  Smile  So, here are some ideas you can try if you decide to pick up this set:


    And my absolute favorite because it feels so fresh and summery to me:

    So see… lots of different looks and sentiments all from one very unassuming stamp set.  What do you think?  Is this a set you can imagine using?

    Leave a comment & not only will I love and appreciate your thoughts – but you’ll be entered in this weeks Blog Candy as well!

    Join me tomorrow as I share more fun ideas using a new Sale-a-Bration stamp set.

    And in the meantime, don’t forget to get your name in the hat for the Big Sale-a-Bration Celebration drawing!  Place an order, attend my Sale-a-Bration send off party on Friday, or sign up to host a private class and you could win one of many fun prizes.  Check out this post for all the details!

    To Order Stampin’ Up! Products Anytime, click here!

    See what you can get FREE with every $50 you spend

    Don’t miss your chance!  Get your choice $156 worth of products for only $99 when you join my Fun n’ Crafty group of demonstrators by March 22nd!  

  • Scrapbooking Sunday: Butterflies & Tea for Two!

    Ugh, I am terrible at titles for blog posts but I am so excited to share this scrapbook layout with you today!  I just LOVE how it turned out and hope you can use some of the ideas I had to dress up your own scrapbooking layouts and cards.  I used the Tea for Two designer paper and the Bloomin’ Marvelous stamp set as my inspiration for the theme of the page.


    So, this is a layout that I had to create because each year I always go to the Stampin’ Up! convention and of course, the big celebrity is Shelli Gardner herself!  And so, I had to get Caitlin (and my) photo with her last year and document it.  Because if there aren’t pictures, it didn’t happen…. right?  Smile

    So, let me show you some of my accents and details that went into this page so you can use them on your own projects later:

    Heat Embossed Title

    Ok, so, if you’ve been in my craft room, you know I’m obsessed with alphabet stickers and alphabet dies so I can create custom titles for my pages.  Well, sometimes I have stamps that fit just right for my title and when that happens, I love to do some heat embossing.

    In this case, I pulled the convention-exclusive stamp set they handed out last year and stamped the flourish frame in Versamark and embossed with Basic Black embossing powder.  Then I stamped the words from the same set in Versamark and embossed again with white embossing powder.

    And did you see those butterflies?  My mom suggested earlier this week that you could layer the small butterfly punch on top of the Elegant butterfly punch.  Well, I decided to give it a try by stamping the butterfly from the Bloomin’ Marvelous Sale-a-Bration stamp set and punching it out with the Elegant Butterfly punch.  Add a little Dazzling Details glitter glue in the center of each butterfly and you get this:

    I wanted to add some texture and so I first added the Stitched Grosgrain Whisper White ribbon along the middle of the strip of chevron designer paper from the Tea for Two designer paper pack.  It was a perfect subtle touch.  And then (of course after I glued down my pictures) I decided I wanted to add a doily too.  So, I hacked up one of the paper doilies and gently pulled up the edges of my photos to tuck it under.

    And then finally, even after sponging the entire edge of the page with Calypso Coral ink, I decided that the upper left corner needed something.  So I grabbed some scraps of the different patterns from the Tea for Two designer paper pack and snipped the ends into banners and glued/stapled them to the top of the page.

    I am really happy with how it turned out and hope you got some fun ideas too!  I’d love to hear what you think.

    P.S. – Don’t Forget! 

    Today is the LAST DAY to sign up for My Paper Pumpkin to get your kit in March!

    Make sure you are signed up and then let me know so I can get you your bonus gift from me!  Sign up here

    To Order Stampin’ Up! Products Anytime, click here!