Northwest Stamper

Tag: better together

  • Limited Time – Build Your Stash Card Class By Mail

    Limited Time – Build Your Stash Card Class By Mail

    I’ve been promising this class by mail for a while and I finally have everything up and ready so you can make these cards at home!  So I’m offering this as a class by mail for a LIMITED TIME only as many of the supplies are retiring and are while supplies last.

    ***Class kit registration is available through May 19th***

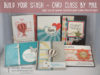
    I ran this as a class at my recent Northwest Crafty Retreat Weekend and everyone loved the cards.  So I knew I had to make it available to my crafty friends who couldn’t make it to the retreat!  Its centered around the Cupcakes & Carousels designer paper stack.  A great paper pack that is so much more versatile than it seems at first glance.

    Check out what you get in this great card class by mail

    You’ll get supplies to make 12 cards!  2 each of the 6 designs including:

    • Precut cardstock to make the 12 cards
    • A FULL PACK of the Cupcakes & Carousels designer series paper, with the needed piece precut for you for these cards.  You’ll have the remaining pieces from the 48 sheet 6×6 pack included in your kit so you can make more cards and projects beyond these 12 cards.
    • A FULL SPOOL of the Very Vanilla 1/4″ Satin ribbon, with the pieces you need for the cards precut.  The rest of the 10 yd spool will be in your kit to use on future projects.
    • Punched and die cut pieces for the cards
    • Necessary accessories and embellishments
    • Step-by-Step color PDF tutorials for each of the cards emailed to you
      (PDF tutorial only option is also available)

    Build your stash -card class by mail to make at home

    You just need to supply your own stamps, ink, and adhesive and you’ll be ready to have your stash ready for anything.

    All this is only $34 plus shipping to you!


    Class kit options


    Class kit registration is available through May 19th
    Kits will ship the following times: 
    Early Bird orders placed by May 3rd will ship the week of May 8th
    orders placed May 4th-May 19th will ship the week of May 22nd

    If you have any questions or need extra supplies, email me at Jennifer@nwstamper.com

    NWstamper signature_thumb[9]

    order online button for sig 3_thumb[4]

  • Bright Birthday Card with a Swirly Scribbles Thinlits Bouquet

    When I start working on a project, sometimes I have a plan in mind, but often I turn to pinterest or google image search to give me a starting point for my project.  Most of the time, I end up mixing and matching my favorite ideas from multiple cards into one card.  But sometimes I come across a card that I love so much that I just have to make it exactly as I see it.  Today is one of those cards!  Check out how fun and cheery it is:

    I saw this card by Shannon Kay on Pinterest and loved the colors and layout, I just needed to change up the sentiment since I thought this would be the perfect birthday card!

    Tips and Tricks for this card:

    • Pick the perfect color palatte!  When trying to figure out what colors to use on cards, I usually start by looking at color combos from designer paper or start from a color family.  In this case, you can start with the Subtles color family and grab Calypso Coral, Pear Pizzazz, and So Saffron. But then the perfect third color comes from the 2016-2018 In Colors – Peekaboo Peach!  Aren’t they great together?

      TAMS Color Builder (2)
    • Swirly Flowers from the Swirly Scribbles Thinlits – these swirls are great for decorative accents, birds nests, and in this case… flowers!  When you look at your dies as they come in the packaging, you will see the little swirl die is sitting inside the larger swirl.  So, that big Saffron flower is actually two dies, the larger swirl and the smaller swirl stacked together.

    • Tie in a pop of color in your backgrounds with monochromatic designer paper – This is one of those times where the color family Designer Paper Stacks are great.  They are sets of monochromatic paper that is perfect for adding an interesting background paper without being so busy as to take away from your main image.
    • Pick the perfect sentiment! I love sentiment sets that give you a variety of fonts and phrases since it gives you lots of options on your cards.  In this case, I’m using the Better Together stamp set and it is one that I totally overlooked in the catalog for the longest time, but turns out it really adds some fun to your cards.  I mean, who wouldn’t smile getting this card and the happy “Happy Birthday!”?

    Who do you know who could use a smile like this on their birthday?

    And if you want to make fun cards like this with me (we did this one in stamp club a little while back), consider joining me for one of my monthly card making classes here in Redmond, WA!  We have lots of fun and there are multiple options a month to come get your crafty on.  Check us out over on my meetup here – the Bellevue-Redmond Card Makers

    NWstamper signature_thumb[9]

    order online button for sig 3_thumb[4]

    October Online Stamp Club Hostess Code – YG62GG6C
    Get free exclusive tutorials each month and even get the supplies in a Make & Take kit with your order over $40 when you use the monthly hostess code!

    Stock up on those pretty papers!  Click the image to get yours!
    B3G1DSP_DemoHeader_NA

    Project Measurements:
    • Whisper White cardstock – 5 1/2” x 8 1/2”, 3 3/4” x 5”
    • Peekaboo Peach designer paper – 1 1/2” x 5 1/2”
    • Scraps of So Saffron, Calypso Coral, Peekaboo Peach, Pear Pizazz cardstock

    Product List

  • Bring on the Pink for Breast Cancer Awareness Month & the Ultimate Pink Blog Hop!

    Bring on the Pink for Breast Cancer Awareness Month & the Ultimate Pink Blog Hop!

    ultimate-pink-blog-hop-badge

    Welcome to the first ever Ultimate Pink Blog Hop – a collection of ideas from Stampin’ UP! demonstrators all over the globe featuring shades of pink in honor Breast Cancer Awareness Month.  Having had a grandmother who had to battle breast cancer, this is a cause that I know can affect anyone at anytime, and I loved the chance to participate in this fun way to play with all things PINK while raising awareness for this.

    I started by grabbing all my pink papers and had planned a “Thinking of You” card, but as things started coming together, it took a little bit of a turn and ended up here… 🙂

    baby-girl-card-with-cookie-cutter-christmasI had a lot of fun mixing all my pink papers with some of the new items in the Stampin’ Up Holiday catalog to create an anything but Holiday card!

    Not just “Holiday” items:

    • Use the bear in the Cookie-Cutter Christmas stamp set to make an adorable bear for a new baby!  Just pick your color to suit the gender or parents…
    • Fancy Frost Designer paper has many great anytime designs and is a quick way to add texture without having to pull out an embossing folder and BigShot.
    • Matching Glitz comes from the Fancy Frost Sequins – I shared a Frosted Medallions card recently using them for New Years or bust them out for Christmas, but the sequins are perfect for a baby too.

    baby-girl-card-with-cookie-cutter-christmas-side-view I mixed and matched my colors for this too.  Good thing there are lots of pinks to choose from in Stampin’ Up’s color palette and they all go great together!  I had

    • Melon Mambo for the card base,
    • Pink Pirouette and Blushing Bride cardstock for the stripes,
    • and Blushing Bride glimmer paper for just that extra sparkle.  Gotta love sparkle!

    baby-girl-card-with-cookie-cutter-christmas-close-up Now if you missed this bear (it’s easy to do!), she comes from the Cookie-Cutter Christmas stamp set.  You stamp the bear body first and then add in the ears (thankfully both ears are together on ONE photopolymer stamp so you don’t have to worry about spacing and you can see what you are doing!) .  Finally, add in the fun face and you are good to go.

    If you want, stamp the bow and then punch it out with the coordinating Cookie-Cutter punch!  (And yes-siree, they are offered together in a discounted bundle!)

    PS – I have all the project dimensions below if you want to make this for yourself.  🙂

    Thank you so much for checking out my PINK idea and don’t miss out on even more great ideas on this blog hop – To continue to be inspired whether you’ve come from the person previous to me or after me (#4 – Jennifer Blomquist) on the list below, all participants are listed to help you as you journey among us being filled with pink inspiration.


    Happy hopping!

    NWstamper signature_thumb[9]

    order online button for sig 3_thumb[4]

    October Online Stamp Club Hostess Code – YG62GG6C
    Get free exclusive tutorials each month and even get the supplies in a Make & Take kit with your order over $40 when you use the monthly hostess code!

    Project Measurements:

    • Melon Mambo cardstock – 4 1/4″ x 11″
    • Pink Pirouette cardstock – 2 1/2″ x 4 1/4″
    • Blushing Bride cardstock – 1″ x 4 1/4″
    • Fancy Frost designer paper – 1″ x 4 1/4″
    • Whisper White cardstock – 2″ x 2 3/4″
    • Blushing Bride glimmer paper – 1/2″ x 4 1/4″

    Product List