Northwest Stamper

Category: Paper Pumpkin

  • ICS Blog Hop–Season of Gratitude

    Welcome to November and fun new blog hop with the Inspire, Create, Share gals!  We’ve decide to do something a little bit different this month and we are pulling out our Paper Pumpkin boxes for this month (technically they are from October, but hey, November’s kits don’t ship until after November 10th, so you have time to sign up for yours!)

    As I often do, I create the design the way the instructions tell us to for the first project, and then I start exploring what other options I can do to change things up!  I usually stick with trying to figure out ideas that you can make using ONLY WHAT IS IN THE BOX.  So I don’t grab extra ink, paper, or punches when I’m starting out.  I want to give folks ideas of what they can do even if they don’t have a bunch of other supplies in their craft room.  So, check out what my favorite alternative turned out to be:

    October 2016 Paper Pumpkin Alternative Card Design

    Now, I’ll share what the cards in the kit are “supposed” to look like.  This is my first card created using the instructions as they were written for the kit.  You end up making a fall shaker card when you are done.  And it is kind of hard to tell, but that Vanilla paper is actually dry embossed, so those grooves are part of the paper.  Which made me want to bust out my sponges and try coloring it, which led to the second card version:

    It wasn’t my favorite, but I thought I would share it anyway.  Also, it leads me to a tip or reminder… depending on who you are.

    Paper Pumpkin Project Tip

    • When you are adhering the Window Sheet to the back of the leaf cut-outs don’t worry about putting adhesive on all sides of the window sheet!  I did that with my first one and totally ruined the window sheet because there wasn’t enough room without the adhesive being exposed through the die-cut holes.  And let me just say, an Adhesive Eraser is magic, except not so much on acetate sheets. Smile  They still smear all over the place!  So just put adhesive on the Vanilla Die Cut Sheet around the holes and press the window sheet onto that.  You just need to make sure the holes are covered, it doesn’t have to be perfect.
    • The instructions say to use the foam strips (to contain the sequins) on all 4 sides of the embossed Vanilla piece; and while that works, you often won’t see your sequins!  So, in the card above, I made my foam strips make a small rectangle just around where the die cut holes are.  That way, the sequins are almost always viewable.  Then I just added some extra foam along the far left edge to keep the paper balanced and steady.
    • Don’t forget to put your sequins on the bottom paper (in this case the card base) and NOT onto the window sheet.  By making little piles on the bottom sheet, you can place the top layer (with the holes) exactly where you want and still see what you are doing.

    But now, back to my final alternative that I really like!

    I switched away from the Shaker card idea and instead started cutting out my favorite elements.  I cut out the die cut leave holes and then trimmed down some of the background colored paper to fit behind them.  I loved the crackle stamp for the cool effect that you get for the leaves, so I had to keep that in there – and now you can see it even better because you don’t have to look through sequins!

    I used Stampin’ Dimensionals to raise the die cut holes over the stamped paper, and then glued those down directly to the card base.  Then it was time to figure out the sentiment.  I used the same die cut shapes and just layered them a little bit differently:

    But I didn’t want it to be too plain, so I layered back in one of the die cut pieces that popped out to make my shaker card and added a stamped acorn from the stamp set that comes with this month’s Paper Pumpkin kit.  And you may remember me telling you that when I do these alternative cards, I don’t grab extra papers and inks from my stash, so want to know where I got the paper for that acorn?  Check it out – it’s the left over paper in between the Cajun Craze tags!

    2016-11-02 15.24.35

    Then just add a few extra sequins and you are done!

    I hope you have enjoyed this Paper Pumpkin kit alternative idea!  Keep on hopping and check out what Andrea has in store for you, for even more great ideas.

    And don’t forget, if you like these ideas – you can always get MORE of the kits by purchasing refills in the Online Store!

    • If you are a current Paper Pumpkin subscriber, you get exclusive access to refill kits for past months as a great price.  see them here
    • And if you weren’t a subscriber before, you can always join now and get immediate access to be able to purchase refill kits, plus you’ll be all good to go to get this cute Holiday Exclusive box in your mailbox for November!

    14917149_1784322711825603_4425822216026875299_o

    Thanks for hopping!

    NWstamper signature_thumb[9]

    order online button for sig 3_thumb[4]

    14947527_10153874106165776_4026858921570814699_n

    November Premium Tutorial Pack Hostess Code – YG62GG6C

    NEW! I’ve joined with a group of amazing talented demonstrators – many of whom have been designers for the Stampin’ Up display boards at the Conventions with me, plus Artisan Design team members, and other talented folks, to create a set of great project tutorials just for you featuring the stamp sets that are on sale this month!  You can get your free copy of this SET of great project ideas by either:

    Place a $50 Stampin’ Up order with me (either directly or in my online store using the hostess code above) in the month of November

    Join my Fun n’ Crafty Stampers!  My team gets a copy of this Tutorial Pack for FREE!

  • LAST CHANCE for 50% off Paper Pumpkin Subscriptions

    Just a quick reminder that if you were thinking of giving Paper Pumpkin monthly kits by mail and wanted to get in on the 50% off for 2 months deal, TODAY is your last chance to SAVE!

    Here is what we got in August:

    So cute, right?! 

    I can tell you that the kit coming this month is Fall/Halloween themed for fun 3D treats/gifts.  But even if that isn’t your thing, you can always sign up now to get in on the great deal and just SKIP this month, you’ll still get 50% off your next 2 months!  This is an awesome deal given that it typically runs $19.95, which is also a great deal because each month we get:

    • Exclusive subscriber only stamp sets
    • Precut cardstock & accessories
    • All the ribbons & embellishments
    • INK!  (guaranteed different colors each month for at least 12 months!)
    • A clear block with your first kit that you can use with ALL the stamps in future kits
    • Extra supplies – just in case you need them
    • Exclusive access to purchase refill kits (everything but the stamps and ink for only $8!) or complete extra kits while supplies last! (see them online here)

    Join the Paper Pumpkin Fun – Sign up here

    NWstamper signature_thumb[9]

    order online button for sig 3_thumb[4]

  • New Weekly Deals–Ribbons and More Galore!

    It is a Tuesday Quickie here!  Just wanted to make sure you had heard about the latest deals… especially since they are so cute!

    New Weekly Deals

    11800495_10205059731236314_4954220019427063650_n

    I’ll be putting in an order today and possibly another later in the week.  So you can either email me with what you want or start shopping online here – See the Weekly Deals in the Store

    New Paper Pumpkin Promotion

    While I was at convention, Stampin’ Up also announced a new Paper Pumpkin promotion.  So if you haven’t subscribed before, or stopped a while back, this may be a great time to give it a go. 

    image

    This is an awesome deal given that it typically runs $19.95, which is also a great deal because each month we get:

    • Exclusive subscriber only stamp sets
    • Precut cardstock & accessories
    • All the ribbons & embellishments
    • INK!  (guaranteed different colors each month for at least 12 months!)
    • A clear block with your first kit that you can use with ALL the stamps in future kits
    • Extra supplies – just in case you need them
    • Exclusive access to purchase refill kits (everything but the stamps and ink for only $8!) or complete extra kits while supplies last! (see them online here)

    Start your new subscription here

    PS – if you have been a subscriber before, make sure to sign up using a DIFFERENT email address to make sure you get the 50% off.

    I’ve seen the next 2 months of kits, so if you have questions, let me know and I’ll give you the scoop!


    NWstamper signature_thumb[9]

    order online button for sig 3_thumb[4]

  • World’s Greatest Father Card with Guy Greetings

    World’s Greatest Father Card with Guy Greetings

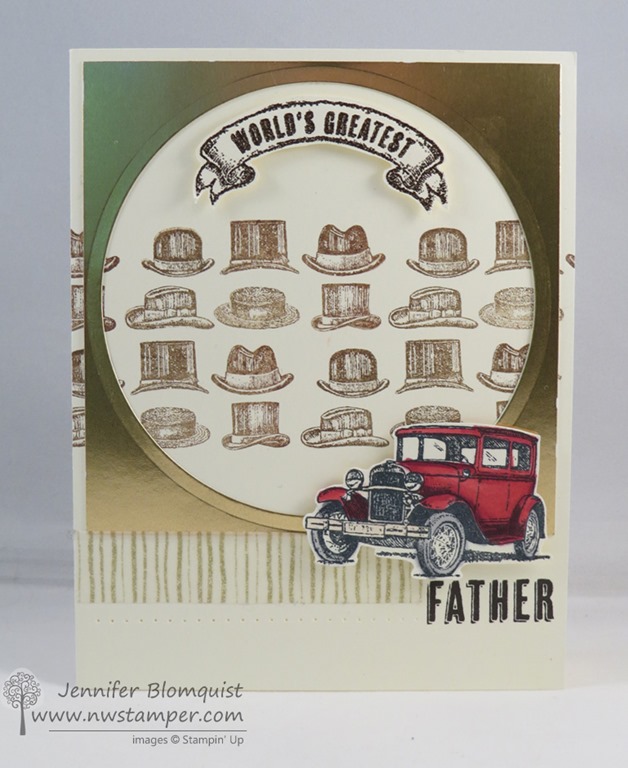
    I can’t believe Father’s Day is coming up quick!  This year I’m bound and determined to make a gift early… I’m not sure what the gift will be yet, but at least I have a card ready!

    I aimed for the balance of fancy but not fussy, and I think it makes it there.

    Tips for making this card:

    • Mix and match the images from the Guy Greetings stamp set to make this for that special guy in your life. 
    • The stamp set not only says “Father” but you also get the choice of Grandpa, Dad, Uncle, Husband and Brother!
      image
    • Stamp the hats image multiple times to make a background for your card.  To help blend in the fact that you are using the same stamp a bunch, stamp the first time and then offset the second stamped image – ie stamp so the last row of the hats in the first image are lined up under the middle row of hats in the second image.
    • Spotlight them by using the Circles Framelits and cutting out a large circle from a 4”x4” piece of the Gold Foil paper – which is awesome stuff, btw!
    • Stamp and cut out the “Worlds Greatest” and the car image to give extra POP on the card.
    • Make it a little more polished by heat embossing the “World’s Greatest” and the “Father” sentiments.
    • I also added a bit of the retired gold Watercolor Wonder washi tape and the used my Essentials piercing template to pierce a row of holes from the left edge to the “Father” sentiment.  Sometimes the little details are just what it needs!

    A few of the steps take a little bit of work, but for the awesome men in our lives, it is worth it, right?

    Want more ideas with this set?

    You can still get the instructions for the class by mail from last month and I have 1 kit left if you want an actual kit.  Get the details here.

    And here is a little something for you – new discounts with the Weekly Deals!

    Shop the weekly deals here

    Paper Pumpkin Special – Ends Tomorrow!

    And if you missed out on the Paper Pumpkin deal last month and wish you had tried it, there is a summer special available through TOMORROW

    paper pumpkin promotion

    Sign up here with code SAVE50


    NWstamper signature_thumb[9]

    order online button for sig 3_thumb[4]

    Project Supplies Used:

    Supply List

    Built for Free Using:  My Stampin Blog

  • Thanks to all the Moms out there! Happy Mother’s Day!

    Happy Mother’s Day to you and your Mom!  I’m hoping to have a relaxing day with my family and hope you are close enough to yours to do the same.  And if not, then at least a day to sit back, relax, and enjoy happy memories of your loved ones. Smile 

    I wanted to share this fun card from a past Paper Pumpkin kit as my thanks to my Mom, Kathy Thisted, who truly is seriously amazing. Smile  Especially because she has had to put up with me and my wild, determined, independent ways as I was growing up!!  And that she fostered a love of creating and continues to share it with me as we share our experience with Stampin’ Up together!

    2014-07-18 13.45.08

    So here is to all the moms out there!  And all the crafty families.

    Here is a little bit more about the project too:

    • I told you the Paper Pumpkin kits were improving, didn’t I? Smile  This is the “Seriously Amazing” kit and it has all kinds of fun sentiment options from Thanks, Hello, Smile, and Congrats.  AND you can still get it as a Paper Pumpkin subscriber too (or if you just want to sign up to try it and pick up some awesome extra kits along the way!)
      Check them out:  Seriously Amazing Full Kit  |   Seriously Amazing Refill Kit
    • Make this same style of card by die cutting out your letters from a white piece of cardstock and add some stamped flair (like the Hello Honey dots here) around your cut out word.

    • Layer your die cut word over some patterened paper, and keep up up with Stampin’ Dimensionals for a cute look.
    • Add a few sequins for a different style of sparkle and shine… attach with a glue dot – easy peasy!
    • Layer your sentiment with a banner to tell her how you really feel.


    And if you aren’t a Paper Pumpkin subscriber yet, it is an fun way to get projects in the mail each month and you can pause or cancel anytime, plus have immediate access to purchase some of the awesome past kits.  So consider giving it a try! 

    Try Paper Pumpkin Today

    Have a wonderful day and thanks for sharing some of it with me. Smile

    NWstamper signature_thumb[9]

    order online button for sig 3_thumb[4]

    Project Supplies Used:

  • Hurry! 24 Hour Flash Paper Pumpkin Sale! ENDS TONIGHT!

    Last night I got home from dinner and I discovered that Stampin’ Up had posted a 24 hour sale on Paper Pumpkin subscriptions!  You know, a surprise box in the mail with everything you need (except glue) for around 8 or more cute projects!  You can get your first month – May- for only $5!
    You just have to sign up with a new subscription by TONIGHT (5/9) at 6:50pm PST.

    >>> Get Signed Up Here <<<

    This is an awesome deal given that it typically runs $19.95, which is also a great deal because each month we get:

    • Exclusive subscriber only stamp sets
    • Precut cardstock & accessories
    • All the ribbons & embellishments
    • INK!  (guaranteed different colors each month for at least 12 months!)
    • A clear block with your first kit that you can use with ALL the stamps in future kits
    • Extra supplies – just in case you need them
    • Exclusive access to purchase refill kits (everything but the stamps and ink for only $8!) or complete extra kits while supplies last! (see them online here)

    For example, this is what we got for April:

    (photo by Carrie Rhodes)

    Here are a few of my favorite projects people have created recently with some recent Paper Pumpkin kits (all found on the Paper Pumpkin Pinterest Page!):

    Like making treat bags from cards… or using left over felt from the February kit on the side of the Tag a Bag Boxes!

    And I love seeing what people do with the left overs from the kit like this fun card using left overs from the December kit:

    And if you get a 3D kit like the Valentine’s Treats, there are lots of ideas for other things to make too!

    Here are what the kit projects have been looking like:

     March 2015 Paper Pumpkin Kit
    March 2015 – 9 cards with pierced words for optional threading
     April 2015 Paper Pumpkin Kit
    April 2015 – 8 cards with Kraft Pockets
    January 2015 Paper Pumpkin Kit
    January 2015 – 24 treat bags with embellished clips
     February 2015 Paper Pumpkin Kit
    February 2015 – 8 accordian cards and little boxes w/ 48 felt letters
     November 2014 Paper Pumpkin Kit
    November 2014 – 8 die cut cards, 12 die cut gift tags
     December 2014 Paper Pumpkin Kit
    December 2014 – 9 Fun Shaker Cards with Envelopes

    See?  Way cute and lots of great options!

    It’s no obligation too.  You can skip a month, as many times as you need, you can order an extra kit one month when your Mom is visiting or you need an extra gift, or cancel at anytime.  So for $5 and you know you’ll get a fun stamp set and ink, what do you have to lose?

    Don’t forget, this ends TONIGHT (5/9) at 6:50 pm MST and use promo code “24hours”!

    Get your Paper Pumpkin experience started today!  Sign Up here


    NWstamper signature_thumb[9]
    order online button for sig 3_thumb[4]
  • Don’t Forget! Sign up by tonight to get in on the CUTE August Paper Pumpkin Kit

    Do you get that little orange box of fun each month?  Which box am I talking about?  That orange Paper Pumpkin one, of course! Smile 

    PAPER PUMPKIN TURNS ONE!I know, I haven’t been very good about posting pictures of my creations with My Paper Pumpkin lately, but I have to admit, since they’ve made strides to improve the kits this spring, I think they have gotten a lot better and holy moly in the last few months I have gotten SO MUCH STUFF in one little box its always a fun adventure to see what else I can create with it.  For example this is July’s kit:

    Sample of July’s Paper Pumpkin Kit (you got enough for 6 cards AND 6 boxes w/ tags)

    But you actually had enough supplies to make:

    • 6 boxes w/ ribbon and tags
    • 6 cards with envelopes
    • 6 more tags
    • extra ribbon
    • around 36 EXTRA silver stars
    • oh, and the insides to ALL the stars were left over
    • Plus extra stickers… oh my!

    Yeah, all that for only $19.95 shipped… yes, that is right, that INCLUDES shipping!

    Ok, now for the reminder part…. You have to be subscribed by TONIGHT to get in on the August Paper Pumpkin kit.  They start processing credit cards and shipping the kits out tomorrow.

    Now I got to see this upcoming kit while at convention and I CAN’T WAIT to get mine!  I can tell you it is a card kit (sorry… spoiler alert!) and I thought it looked like a lot of fun.

    Even better….image

    Wha Bam!  Get your next two kits for only $10 SHIPPED!  I know, right?!  Yay!  So, if you are ready to join me on a crafting adventure each month, just sign up here and I can’t wait to stamp and share our creations:

    SIGN UP FOR MY PAPER PUMPKIN HERE

    spaced shop now sig bar

    August Online Stamp Club Hostess Code – TT2NETD4
    Use this code to get free exclusive tutorials & project kit! Learn more

  • Stampin’ Up Convention 2014–Check In Day

    Stampin’ Up Convention 2014–Check In Day

    I told my mom that I wasn’t going to stay up until 3 again… but somehow it is 2:30am and so I’m going to have to keep this quick.  But I couldn’t go to bed without sharing some of the fun that is happening here in Salt Lake City!  Oh, but first:


    NORTHWEST STAMPER CONVENTION SPECIAL

    Free Shipping on All Orders using hostess code 7RDHVEKR

    I wanted to do a little something-something while I was away playing at Convention, so I thought I would give you all free shipping this weekend!  Place an order online using the hostess code 7RDHVEKR and when I get back from my trip I will send you a handmade thank you card and a refund of your shipping!

    Good through 7/20/2014


    Ok, now on to the fun stuff, right?  Here is your 2014 Stampin’ Up Convention recap for check in day:

    karen swap creating on a plane

    We left hot and sunny Seattle early in the morning (we being my mom, Kathy, and myself) to fly to Salt Lake City for the Stampin’ Up convention.  The night before I learned that Karen (one of my downline and Fun n’ Crafty stamper) had not been able to make cards for a swap due to life circumstances.  And since I knew she would have tried if it was all possible for her to do it, I decided to surprise her by creating 25 card swaps for her while on the plane…

    ok, I didn’t finish them all on the plane, but I did get the stamping done!  the rest we finished at the hotel. Smile 

    Fun n Crafty Stampin Up convention display board setup

    Then after some lunch, myself, Kathy, and Karen headed in to the Gathering Place and the display boards to start setting up the board that my group had been asked to fill.  We have some fantastic stampers in our Fun n’ Crafty group and I was so excited to be able to share some of their creations with everyone at convention! 

    (For those of you that love display board pictures, check back tomorrow when I’m allowed to officially post pictures Winking smile)

    We went off to a group dinner and stamping with some friends and then soon it was 6pm and time for Convention bag pick up and the Paper Pumpkin Night Out party!  As you can see, a lot of people were excited to get their convention bag.

    I got in and out of line 3 times over the course of the evening but turns out the “B” line or “A/B” line (since we were picking up based on our last name) was a popular one this year. Smile

    Rich Jutkins convention bag stuffing

    Something fun to see… Rich Jutkins (the President of Stampin’ Up) and Sara Douglas and her family all were helping get bags and supplies put together for use!  It’s not everyday you see executives for a company getting down and dirty helping serve the rank & file.  And this is one of the many reasons why we love them!

    Then it was off to the party with lots of cookies and cake treats, a make & take featuring the September 2014 Paper Pumpkin kit, prizes, and a couple displays (though the lighting was terrible for photos).

    I’m so grateful to be able to attend many of the Stampin’ Up events and thought it was so cool to get a chance to hang out for a few minutes with Stampin’ Up home office staff and stamper extrordinaire – Shannon West – and the oh so sweet Andrea Withers who has been the coordinator for all my Convention Display Board activities this year!  <3 them!

    And eventually I got my bag and all the goodies it contained (stamps and supplies for this weekends crafting projects, including NEW sneak peek stuff!!)

    The Convention bag this year is actually a nice bag that is perfectly sized for tablets (or a few stamp cases as I discovered).  It isn’t huge, but that is probably a good thing for me! Have you seen how full I stuff my bags??! Smile

    These aren’t all the photos I took, these photos and more are up on my Facebook Page and I’ll be sharing more over the next few days while I’m out and about the conference and then posting many of them at night.  So, make sure you have liked my page to get all the updates!

    Ok, and now I REALLY need to get some sleep.  My alarm goes off in 3 hrs!

    spaced shop now sig bar


    FREE SHIPPING Convention Special! Get free shipping on all orders through 7/20/2014 when you use the hostess code 7RDHVEKR.  Shop online here

  • More Paper Pumpkin Refill Kits are Out!

    More Paper Pumpkin Refill Kits are Out!

    Are you a Paper Pumpkin subscriber? 
    Did you sign up and got your welcome kit the same month some really cute kit came out? 

    Well, if so… today may be your lucky day! 

    Stampin’ Up has started releasing some extra Full Kits & Refill Kits to Paper Pumpkin subscribers.  Basically, you can purchase these past kits (or with the refill kits, it assumes you have the stamps and ink, but gives you everything else) and make even more of some of your favorite projects – or give them away as gifts for your friends who just LOVED the card or project you gave them Winking smile

    Here are the newest Paper Pumpkin kits!


    image

    image

    Now, these aren’t the only kits available, they are just the latest that were released TODAY!  These are while supplies last so don’t wait too long for the really cute ones!

    Check out all of the available kits here

    The only hiccup is that you need to call Stampin’ Up directly to order (1-800-Stampup) or you can call or email me (jennifer@nwstamper.com) and I can call on your behalf.

    What if I’m not a Paper Pumpkin Subscriber right now?

    Well, you have 2 options:

    1.  Sign up!  Your card doesn’t get charged until the kits ship on the 11th of the month and you will receive a $15 set of In Color markers with your first kit too.  Its basically like getting $15 in markers, a card kit, a stamp set, ink spot, and clear block for only $20 plus tax.  Not a bad deal at all!

    2.  Tell me which kits you want and I can order them for you.  Since I am a Pumpkin Subscriber, I can order them and help you out.  The only catch is that if you aren’t local, they will be shipped to me and then you will need to cover shipping to you.  But if that works for you, I’m happy to get you taken care of!

    spaced shop now sig bar

    March Online Stamp Club Hostess CodeXEWP4DFD
    Use this code to get free exclusive tutorials & project kit! Learn more