Northwest Stamper

Category: Kits

  • Need a Super Cute & Super Easy Kit for 20 Cards? It’s Here! The Watercolor Wishes Card Kit

    Ever since the new Stampin’ Up Annual Catalog came into my over-eager hands, I have been waiting to get my hands on this gorgeous new card kit.  Like the Everyday Occasions Card kit from the last kit, this is a NEW All-Inclusive project kit, giving you EVERYTHING you need to make 20 fab cards.  Check them out:Watercolor Wishes card kit card samples

    Aren’t they so cute?!!

    The best part is that everything is precut, you get great printed card bases, AND you get this awesome EXCLUSIVE stamp set that is ONLY available in the kit!

    image

    This is everything you get in the kit for only $35…

    • 20 cards total
      Folded card sizes: 4″ x 4″, 3-1/2″ x 5″, 4-1/4″ x 5-1/2″
      12-piece photopolymer stamp set
      20 card bases
      Die-cut accents
      Cardstock flag stickers
      Night of Navy and Watermelon Wonder Classic Stampin’ Spots
      Washi tape
      Giftable Kraft box
      50 sequins
      Wood die cuts
      Stampin’ Dimensionals
      Acrylic stamp block

    image

    That is only $1.75/card and a FREE stamp set! 

    Seriously, how can Hallmark compete with this cute of card for that price?  Plus you get the pride and your recipient gets the warm fuzzies that YOU MADE IT!  Handmade from the heart, right?

    Want to see more about the kit?  Check out this video that Stampin’ Up put together.  Since the kit only became available yesterday, I don’t have mine…YET!  I will be ordering mine today or tomorrow… but check this out to see it in action!


    (note- if you are reading this in email, click here to view the video)

    Perfectly Giftable!

    This is perfect for giving to friends and family since everything but your basic glue is included.  Get one for you and one for a friend and then plan a fun crafting day.  You don’t have to drag out a ton of supplies or find a big open space.  Just grab the kit, a tape runner, and find a kitchen table or coffee shop table and create and gab!

    Local folks – Since I’m going to be ordering mine shortly, so I’ll open up a GROUP ORDER for anyone who wants in to save a little on shipping.  Contact me by Friday afternoon at jennifer@nwstamper.com to get in on the group order!

    New Summer Spectacular Promotion Hostess Code!

    You can still earn entries for my Sizzling Summer Spectacular promotion!  I’ll be announcing the June winners for the bonus drawings shortly. 

    sizzlin summer spectacular stampin up

    If you are shopping and your order is less than $150,
    please use hostess code XXEAYE4S

    >>> Get your Watercolor Wishes Kit Here  <<<
    or see all the other fun stuff over in the online store

    NWstamper signature_thumb[9]

    order online button for sig 3_thumb[4]

  • Endless Thanks Spring Thank You Card and More! 6 Card Ideas to get you Started with the Starter Kit!

    Ever have one of those days where the mojo just couldn’t seem to get in gear?  That was me yesterday, I think it took me 4 cards before I started coming up with something I liked!  But this all stemmed from a fun challenge I came up with yesterday…

    Pick out a Stampin’ Up starter kit and create class samples that a new demonstrator could use for their first event using just what they got in their starter kit!

    I often get people asking me,”What should I get in my starter kit?” and I have a general list of what to get and where to get started, but I thought I’d try to put together one that uses the kit to it’s full potential.  Especially, when you have promotions like the Two FREE Stamp Sets with Starter Kits ordered by 6/30  (that’s TOMORROW!)  But this is what I came up with:

    June 2015 Starter Kit value suggestion

    >> Order your Starter Kit here <<

    See?? I told you it was an amazing deal… especially because it comes with no obligation and just lots and lots of opportunity!  So, on to the opportunity part, I told you I was having some Mojo struggles yesterday, but thankfully about 4 cards in I started putting together this card and I just LOVED IT!!  What do you think?

    Tips for making this card:

    • Grab the Endless Thanks stamp set and your favorite ink colors and you can use the curved vine to make your own custom wreath!

      image
    • Stamp the larger flower with Watermelon Wonder onto a scrap of Watermelon Wonder cardstock and then cut out by hand for a wreath focal point.  (Its only one little flower so it isn’t that bad for all you folks who don’t like fussy cutting! Winking smile)
    • Spice it up by adding one of the In Color Blossom Accents.  You’ll want to use a Glue Dot to adhere your Accent to the cut flower.

    • The sentiments come mix & match style in the stamp set, so have fun and mix & match your ink colors!  Here I have Memento Black and Delightful Dijon.
    • Use different colors for your wreaths to fit different times of year!  Add more leaves in orange, red, and yellow for the fall…navy, soft sky, and sahara sand for winter, etc.  This summery combo is just the 2015 – 2017 In Colors – Mint Macaron for the vine, then Cucumber Crush, Watermelon Wonder, and Delightful Dijon.

    • If you cut your cardbase to be 5.5” x 8.25” and fold in half, you can easily wrap some of the Cucumber Crush dotted lace trim around the front of the card and tie into a pretty knot to the left of your wreath.

    This would make an easy card for a class or workshop.  If you want to make it slightly more economical for a large group, instead of using the Blossom Accent, cut out the large flower and then add a rhinestone in the middle.  Voila!  A pretty flower for your wreath!

    Now, I told you, I was trying to come up a few cards you could make with this starter kit.  I mean, really, what is the point of getting a starter kit of lots of fun stuff if there is only one thing you can do with it? Smile  So, while I will not claim these are all my best samples ever, they are all ones you would be great for some classes or workshops.  Plus, with your starter kit, you would have supplies to make LOTS of all of these cards – So invite lots of people to join you for your kick off event! You could even do 2 or 3 at your first event and then do 2-3 more at your next event…how is that for planning?!

    If you decide to join my Fun n’ Crafty Stampers group, I’d be happy to send you close up pictures of all of these cards and cutting dimensions for all of the paper pieces.  Smile   I also give everyone in our group copies of my class by mail project tutorials each month.  So you’ll continue to get more class and project ideas throughout the year too!  We can’t wait to welcome you to our group!  Get started by ordering your Starter Kit here

    Coming to my Playing with Color – Meet the In Colors Class or getting it as a kit by mail?  I’ll be including the supplies for this as a bonus card for you!  I just loved it so much and you’ll have all the ink, so I figured why not add it in to the class!  RSVP here or order your kit by mail!

    Suggested Starter Kit items & item numbers:

    • 2015-2017 In Color Ink Pad & Cardstock Bundle (#138358)
    • 2015-2017 In Color Ink Refills (5 colors – #138329, #138332, #138331, #138330, #138328)
    • 2015-2017 In Color Markers (#138333)
    • Whisper White Cardstock (#100730)
    • Memento Black Ink (#132708)
    • Notetag Punch (#135860)
    • In Color Blossoms Accents (#138383)
    • Dotted Lace Ribbon (Cucumber Crush -(#138423)
    • Rhinestones (#119246)
    • Stampin’ Dimensionals (#104430)
    • Glue Dots (#103683)
      Endless Thanks Stamp Set – FREE w/ June 2015 Promotion (photopolymer #138796)
    • You’ve Got This Stamp Set – FREE w/ June 2015 Promotion (wood mount – #139572,  clear mount -139575)
    • Shipping – FREE!
    • Business supplies (catalogs, order forms, event invite postcards, and more)

    Starter Kit Value

    kit value – $179.50 plus tax & $17.95 in shipping…
    Cost by June 30th?  ONLY $99+ tax.  That’s a $98.45 SAVINGS! It’s 50% off!!


    NWstamper signature_thumb[9]

    order online button for sig 3_thumb[4]

    Project Supplies Used:


  • Hurry! 24 Hour Flash Paper Pumpkin Sale! ENDS TONIGHT!

    Last night I got home from dinner and I discovered that Stampin’ Up had posted a 24 hour sale on Paper Pumpkin subscriptions!  You know, a surprise box in the mail with everything you need (except glue) for around 8 or more cute projects!  You can get your first month – May- for only $5!
    You just have to sign up with a new subscription by TONIGHT (5/9) at 6:50pm PST.

    >>> Get Signed Up Here <<<

    This is an awesome deal given that it typically runs $19.95, which is also a great deal because each month we get:

    • Exclusive subscriber only stamp sets
    • Precut cardstock & accessories
    • All the ribbons & embellishments
    • INK!  (guaranteed different colors each month for at least 12 months!)
    • A clear block with your first kit that you can use with ALL the stamps in future kits
    • Extra supplies – just in case you need them
    • Exclusive access to purchase refill kits (everything but the stamps and ink for only $8!) or complete extra kits while supplies last! (see them online here)

    For example, this is what we got for April:

    (photo by Carrie Rhodes)

    Here are a few of my favorite projects people have created recently with some recent Paper Pumpkin kits (all found on the Paper Pumpkin Pinterest Page!):

    Like making treat bags from cards… or using left over felt from the February kit on the side of the Tag a Bag Boxes!

    And I love seeing what people do with the left overs from the kit like this fun card using left overs from the December kit:

    And if you get a 3D kit like the Valentine’s Treats, there are lots of ideas for other things to make too!

    Here are what the kit projects have been looking like:

     March 2015 Paper Pumpkin Kit
    March 2015 – 9 cards with pierced words for optional threading
     April 2015 Paper Pumpkin Kit
    April 2015 – 8 cards with Kraft Pockets
    January 2015 Paper Pumpkin Kit
    January 2015 – 24 treat bags with embellished clips
     February 2015 Paper Pumpkin Kit
    February 2015 – 8 accordian cards and little boxes w/ 48 felt letters
     November 2014 Paper Pumpkin Kit
    November 2014 – 8 die cut cards, 12 die cut gift tags
     December 2014 Paper Pumpkin Kit
    December 2014 – 9 Fun Shaker Cards with Envelopes

    See?  Way cute and lots of great options!

    It’s no obligation too.  You can skip a month, as many times as you need, you can order an extra kit one month when your Mom is visiting or you need an extra gift, or cancel at anytime.  So for $5 and you know you’ll get a fun stamp set and ink, what do you have to lose?

    Don’t forget, this ends TONIGHT (5/9) at 6:50 pm MST and use promo code “24hours”!

    Get your Paper Pumpkin experience started today!  Sign Up here


    NWstamper signature_thumb[9]
    order online button for sig 3_thumb[4]
  • Christmas Card Kit including a Festival of Trees Christmas Card in Blue

    See, I told you I’d be back with more projects to share! Smile Today’s card is one that I put together for a Christmas Card stamp-a-stack last month.  We were making a bunch of Christmas cards and I had seen this one on Pinterest and thought it was so pretty.  It was created by Amy O’Neill and I had to make a few tweaks to get it to fit with the supplies I had but I think it turned out rather cute!

    One thing that is a bit hard to see from the first picture is that I made the silver garland on the tree especially shiny thanks to silver embossing powder.  Awww… once again, totally forgetting about heat embossing until I do it and am reminded how fabulous it looks on a project!

    You can also see that pretty All is Calm designer paper and the coordinating Lost Lagoon ribbon – both from the Holiday Catalog.  Don’t forget, that catalog is only good for another couple weeks and than most of the items (including this paper and ribbon) will no longer be available!

    Now, as I mentioned, this was for my Stamp-a-Stack and while I’ll be sharing photos from most of the cards from this class over the next week, I also have made the class available at a discount or even FREE to folks starting today!  Check it out:

    2015 Christmas Card kit

    After my last Stamp-a-Stack Christmas Card class, I realized that I had accidentally cut too many card supplies!  Whoops!  And since I have enough Christmas cards ready for this year, I thought I would offer them up to you all at a discount.  You get all the precut cardstock, die cuts, and embossing folder work done for you for 9 cards – 3 each of each design, plus the envelopes.  You can either get the kit:

    1. Mailed to you FREE with a $40 order when you use hostess code XMUM7PJZ
      (note – if your order is over $150, don’t use the hostess code – I’ll make sure you still get your card kit!)
    2. Mailed to you for only $18
    3. Instructions only emailed to you for $2.95

    Supplies are limited!  So, don’t delay if you’d like your own set. 🙂  I hope you enjoy them as much as my class did!

    Purchase the full Christmas Card Kit ($18 shipped)


    Purchase the Christmas Card Kit – Instructions Only ($2.95)


    NWstamper signature_thumb[9]

    order online button for sig 3_thumb[4]

    Project Supplies Used:
    (if you are reading this in email, click here to see the list of supplies)

  • How to Make Really Cute Star Boxes with the Many Merry Stars Kit (with VIDEO!)

    Have you heard me talking about this cute Many Merry Stars project kit yet?  I LOVE it! 20141020TH_HolidaySupplement_en-US It is part of the new Holiday Supplement that just launched today.

    And before you roll your eyes and say, “another catalog?” let me tell you that it is just a few more cute projects and coordinating elements that are a fun addition to what you’ve already seen in the holiday catalog.  The main items is a new stamp set that goes with the Stars framelits along with this awesome Many Merry Stars kit that I’ll be sharing with you today!  Plus, there are some new project life goodies that are perfect for documenting the holidays or for putting together a December Daily album!  (I’ll be talking more about December Daily in the near future).  And some new ways to see some great card kits.   But FYI – the new items in the Holiday Supplement are while supplies last, so don’t delay too long if you see something you love!

    Check out the Holiday Supplement here

     But for today, let me introduce you to the Many Merry Stars boxes!  (And YES! I have a video further down in this post!)

    Many Merry Stars Project Kit

    So stinkin’ cute, right?!  Here is everything you get in the kit… it was actually pretty hard for me to get a picture of all of it. Smile

    In the kit you get the supplies to make 26 3D Stars including:

    • Front and back of 26 different stars made out of Kraft cardstock & gold glimmer paper
    • the side pieces to hold the front and back together – WITH adhesive already on!
    • 2 sheets of die cut printed stars, banners, and bow pieces for embellishment
    • 2 sheets of white die cut banners and tags
    • 1 sheet of cherry cobbler stickers (words & stars)
    • Gold baker’s twine
    • Silver sequins
    • 20 wood snowflake elements
    • Gold Glimmer paper works and star decorations
    • Tips and instruction sheet

    So, for example, on the big star you can see I used some of the sticker words, some gold glimmer accents, the silver sequins, awesome wood snowflakes, and some of the gold baker’s twine.

    For most of the pieces, I used the Tombow liquid glue but in some cases I pulled out my glue dots (for the sequins) and my Stampin’ Dimensionals (for the ampersand).

    You can make big stars or smaller stars….

    And they are super easy to make too!

    Check out the video below to see how easy it is to make these stars.  I walk through making this cute red star (above) from start to finish!

    (If you are reading this in email, click here to see the video on my blog)

    I’ll be sharing more project ideas with this kit over the next few weeks and will be holding a class in November for you local folks!  So, keep an eye out for those!  And if you have any questions or would like to know more, just let me know!

    spaced shop now sig bar

    Project Supplies Used:

  • Get Cards Done Fast with the Happenings Card Kit

    Do you ever find yourself thinking,” I really want to get crafty… but I’m not creative”  or “I would love to sit and stamp but I don’t want to pull everything out”?

    Or maybe you love the idea of relaxing and creating but have no brain cells left to come up with a project to do!  (**raises hand…this is me most nights right now!**)

    Well, I wanted to help give you hope and share some ideas that will help you get the fun and fire for creating back without too much thinking or supplies required!  I know, awesome, right? Smile 

    Fun n Crafty Blog Hop badgeToday is the monthly blog hop for the Fun n’ Crafty stampers and we are sharing projects created using some of the fabulous kits available from Stampin’ Up.  So, make sure you stop by everyone’s blog so you can see even more ideas (and super cute ideas!) that are made so much easier thanks to the power of kits.

    Today I’m sharing the Happenings Card Kit

    happenings card kit

    In this kit, you get all the paper, envelopes, and accessories to make 15 cards!  All for only $14.95… beat that Hallmark! Winking smile

    So, in the kit they give you 3 examples to work with, but I thought today I’d share a few of my own.  I only use supplies from the kit no supplementing, no extra scraps from my craft room.  All I added was some ink and a Thank You stamp!

    or go vertical like these:

    or this:

    See you can totally do that!  And it is cute and fun to give to someone… which is the whole point of making cards, right?  Well, at least one of the main points.  I mean there is something to be said for experimenting with paper and for getting your hands messy!

    And this is only one of the many kits available to make your crafting fun and easy! 

    For example, the Hip Hip Hooray kit lets you make 20 fun cards and actually INCLUDES a stamp set!  Wanna hear the bonus???  It is on the Weekly Deals this week and so is only $14.96!!! No way, right?  Total score.

    But check out what the other Fun n’ Crafty ladies are making this month and see what other awesome inspiration you find!


    Join our Fun n’ Crafty Group & Get Free Paper for 6 months!

    For real!  If you can’t tell, our Fun n’ Crafty group loves creating and loves sharing our crafting journey with each other and with you.  And if you want to come celebrate your love of crafting with us, you can get a SWEET BONUS for picking up the starter kit and joining us – a pack of designer paper of your choice for FREE each month for 6 months! 

    1. First – Pick out $125 in your favorite items from your wish list and order them as your demonstrator starter kit.  You only pay $99 plus tax… the shipping & extra $26 in goodies is FREE!
    2. Next – starting in November, each month as you place an order, add on the pack of paper that strikes your fancy and add it to your order for FREE  (excluding specialty or paper stacks)
    3. Repeat for the next 5 months!

    You’ll get all the fun and perks of being a demonstrator plus free paper on top!  If you have any questions, let me know as I’d love to share with you more about how it works and why I love what I do. Smile  You can email me at jennifer@nwstamper.com.

    Get Started Here

    Stamp, Stock, and Save starts today!

    Stampin’ up is a sponsor of World Cardmaking Day which is October 4th this year.  To help with the celebration, and to encourage you to actually mail the cards you create, you can save 15% on select ink pads, cardstock, adhesive, and envelopes!  Plus, there are a few stamp sets that you can get for 20% off!  Sweet right?!  See everything on sale here.

    spaced shop now sig bar
    Hostess Code:  C2HYWWQM Use this Hostess Code and receive a free gift! (Please do not use the Hostess Code if your order is $150 or more)

    Need a Holiday Catalog?  Check it out online or email me at jennifer@nwstamper.com to get your copy!

  • A Couple Quick Creations Thanks to the Happenings Card Kit

    A Couple Quick Creations Thanks to the Happenings Card Kit

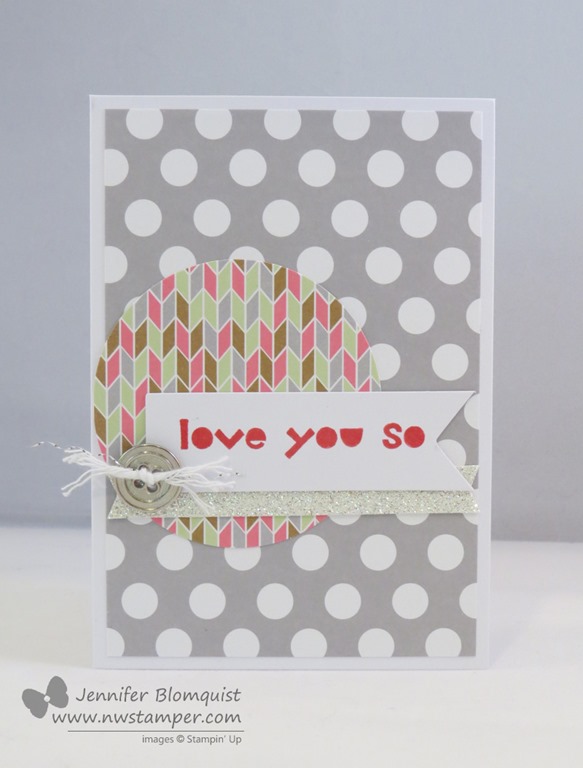
    With the release of the new Stampin’ Up catalog, it is always fun to chat with folks after they have had a little bit of time to flip through it a time or two (or four or twenty… ha ha!)  Always there is a stamp set or accessory or something that has been around for a while that we have TOTALLY MISSED and think are so stinkin’ cute.  And then there are the few items that you see but can’t really picture how cute they can be until you see someone else using them.  For example, this Happenings Card Kit.

    happenings card kit

    I remember completely skimming past it in the Occasions Catalog (yep, this has been around since January) but it wasn’t until they gave us a kit at the Leadership conference in TX that I started to notice it.

    Then finally the last weekend in May I put together a class using this kit which turned out to be a TON of fun!  Everyone got their own card kit- I brought the stamps, ink, and lots of samples for ideas; and we sat around creating our own versions of the 15 cards in the kit.  For example:

    Did you know that the sentiments from the Geometrical stamp set fit really well in the banners?  Since the circle, the banner, and the glimmer paper piece were all die cut – this card was as easy as stamping the sentiment and then assembling!

    Or you can get extra creative with what is left over once you punch out your die cut shapes.  Like this:

    I popped out the big green banner piece and set it aside for another card.  Then there was a little bit left of the green pattern printed on the die cut sheet and so I just grabbed my scissors and started trimming around the patterned shape to get that banner outline!  Totally fun, huh?

    And seriously, multiple people finished all 15 of their cards – each one being unique, I might add, in the 2 or so hours we had allotted!  So, kits can be great for that time saver crafting.

    Stampin’ Up Supplies Used

    I’ll have more projects to share with you using this kit… or if you order this kit from me, I’ll email you a PDF with all 15 of my unique samples!  Gotta make sure you have some fun inspiration to get you started.  Smile

    And if you want some more inspiration, here is one set created by Tanya Cabral at that stamping afternoon:

    Happenings Kit project ideas

    Enjoy and Happy Friday the 13th!

    spaced shop now sig bar

    June Online Stamp Club Hostess CodeACANDKB4
    Use this code to get free exclusive tutorials & project kit!  Learn more

  • Super Fun Spring Wreath with the Burlap and Blooms Kit

    Super Fun Spring Wreath with the Burlap and Blooms Kit

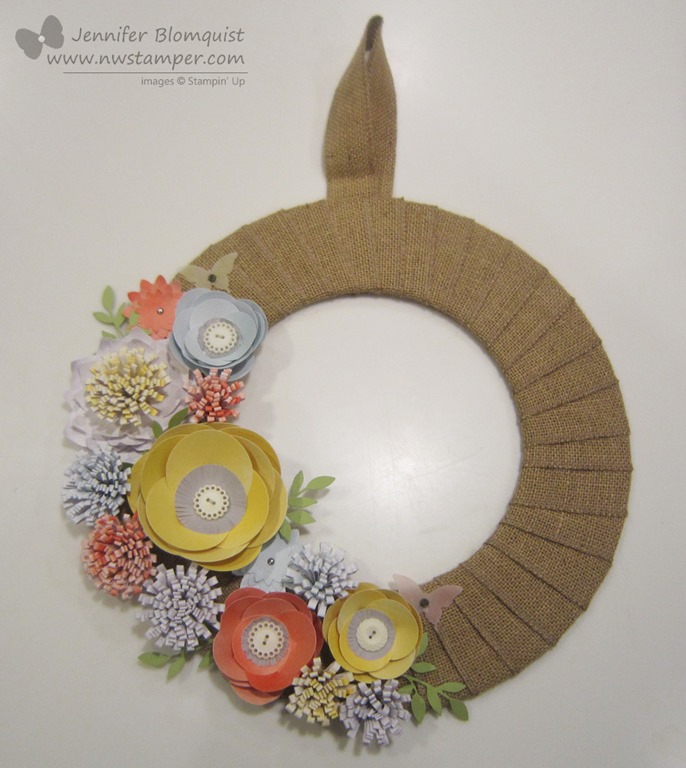
    So, I can make cards.  And I can make scrapbook pages.  I can even make boxes and bags out of paper.
    But when it comes to making cute home décor items, I have to admit I struggle a little bit.  Not because I can’t make them, but because the interior-decorating eye doesn’t come naturally to me and so I never think them up!

    My sister-in-law, on the other hand, doesn’t scrapbook or stamp, but her home has the CUTEST walls around!  I always go over to her place and get inspired to try to make my house look a little more crafty and put together.

    But check it out ….. I totally made this and I LOVE IT!!

    It looks so crafty and fancy and cute… but the best part, I didn’t have to think of much of anything at all and all the tedious work was done for me!  Yay!

    So, I pulled this all together from the Burlap and Blooms Wreath Kit from Stampin’ Up.
    image

    All I needed was a little bit of time – which can be tricky with two small kiddos who always want to craft with you if they see you at your craft table and you are trying to wield a hot glue gun! – and some adhesive.   Oh, and some scissors for a smidgen of fringing – but only on the grey circles in the middle of the big flowers.

    The biggest problem I had was that the instructions were a bit brief and so I had to figure out what I was doing by my best interpretation.  But in case you are a more visual learner, I put together a video that walks you through how to make each of the flower types in the kit!

    Video Tutorial for making the Flowers in the Burlap and Blooms Kit

    (If you are reading this post in email, and can’t see the video – click here to check it out on my YouTube channel)

    Finally, I wanted to add a few little details that were my own –

    I had so much fun making this wreath that I’m thinking of giving her this one and then getting another one to make for me to keep!  She just moved, so it would make a perfect housewarming gift, don’t you think?

    And don’t forget,
    if you grab 1 kit for you + 1 kit for a gift + the Elegant butterfly punch = 1 FREE sale-a-bration stamp set/paper/punch/accessory of your choice!  Score!

    So, give it a try and if you have any questions, feel free to email me at jennifer@nwstamper.com or leave me a comment and I’d be glad to help clarify things for you!

    spaced shop now sig bar

    Stampin’ Up! Supplies Used

    Ink – Calypso Coral, Daffodil Delight
    Paper – Pear Pizzazz cs, Vellum cs
    Accessories – Burlap and Blooms Wreath kit, Multipurpose liquid glue, Hot glue gun, Big Shot, Little Leaves sizzlit, Elegant Butterfly punch, Vintage Trinket embellishments

  • Quick Card Set Using the Season of Style Designer Tags

    I’ll admit, I love a challenge.  Especially when it comes to crafting challenges.  When I give myself a limited set of supplies to focus on, I find it inspires my creativity without overwhelming me.  So, the class I’ve been planning for this weekend has been a great challenge for me!  This week, I finally finished the full set of 20 cards using only:

    The hardest part was trying to make cards that didn’t require stamping.  Sure, they could look even cuter with stamping, but I wanted to make this project easy for anyone to create regardless of what stamps you do or don’t have at home.  But I was able to come up with cards like this one:

    The notecards are a little smaller than an A2 cardbase, but it turns out they are a great size for these tags – which by the way, were marketed as being for the 8×8 divided scrapbooking pages, but I think they make great cards too.  Here are the first 7 cards I created with them:

    Get instructions for all 20 cards with a PDF tutorial!

    I still have 1 spot in Saturday’s class or you can order a kit or tutorial to make this at home yourself.   The class or to-go kit includes the following:

    The class includes:

    • 20 Notecards & envelopes
    • Season of Style Designer Tags (35 tags)
    • Printed pictures of all cards created for the class
    • Additional supplies needed to complete the cards
    • Shipping w/in the US (for the to-go kit)

    The class fee is only $20 for a ton of fun cards or $23 for the Kit to-go
    RSVP for the class online or by emailing me at jennifer@nwstamper.com

    Or get the Instructions only for only $3.95!

    I’ll be emailing out the instructions PDF tomorrow morning after I finish up final editing today.

    You can purchase the kit or instructions only here:

    Class Options


    So enjoy, and have a great day!

    spaced shop now sig bar

  • Make 20 Cards in a Snap with the Everyday Occasions Kit

    Have you been wishing you had a fast way to create a pile of handmade cards to have on hand that you’d be proud to send out?  And do it without breaking the bank too!  If so, you should check out this new Everyday Occasions kit

    When we were at Founder’s Circle last week, they told us that these kits were finally going to be releasing this week.  They are meant to be a great introduction to someone who has never stamped before; but I have to say after looking at the cards, that it looks like fun to me!  Like this love card, how fun is it?!

    Since this is meant for the new stamper, all the elements are precut and pre-punched so it makes it quick and easy to assemble.  The kit comes with a 7 piece stamp set that enables you to make a ton of different types of cards including:

    • Happy Birthday
    • Thank You
    • Congratulations
    • For You
    • Love
    • Thinking of You

    Wanna see them?  Check it out!

    I know, cute…. right?  And I love that they can be used for girls or guys!

    The best part? Its only $29.95… so that is less than $2 a card!  Plus you have ink and a stamp set you can use later.  Way better than getting a card in the store!

    Want to see what you get for that?  Here is the scoop –

    image

    View the full Everyday Occasions flyer with pictures of all the card samples

    This may not be available through the online store, so if you are interested in purchasing a kit, please email me at jennifer@nwstamper.com and I will get back to you right away to get you all set up with a kit!


    Well, I’m off to work on holiday card samples for my 12 weeks of Christmas newsletter (get on the list now) and upcoming Holiday Card Stamp-a-Stacks.  I’ll be back tomorrow with some fun projects to share!


    spaced shop now sig bar