 Woo hoo! This week is hopping – blog hopping that is! This time, its my Fun n’ Crafty Stampers team who are here to share with you some fresh ideas using the newest products – our preorder goodies!
Now, I’ll admit, technically, I might be bending the rules a bit because the goodies I have to show you – you yourself can actually order them TODAY! Say, what?! I’m featuring the Eastern Palace suite that is new in the upcoming 2017-2018 Stampin’ Up Annual Catalog. I’m not going to lie, this was a suite I wouldn’t have really thought twice about if I was just flipping through the catalog. But Stampin’ Up was smart and they decided to offer it early as part of two Sneak Peek bundles (the starter bundle & the premier bundle). So, of course, I ordered it. 🙂 And turns out, I love it!

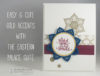
My favorite piece in the suite is the Eastern Gold Vinyl Stickers. That is what makes the shiny gold flower and little circles in the background of my card. They are so EASY to do and because the stickers are clear and fairly close cut to the images, they blend in and look great!

Tips for making this Eastern Palace Clean & Simple card:
- Sometimes the perfect Gold ink is Yellow! As I was creating this card, I wanted to have the stamped ring around my sentiment fit with the gold accents of the card since I didn’t really want to introduce another color to the mix. And right as I was lamenting the retirement of gold ink, I looked at my Color Caddy ink spinner and saw the Delightful Dijon ink pad! I realized that the dark yellow was a great hue to compliment gold. Too bad it is retiring on May 31st, or I’d be using it with this suite all year!

- Scissors is all you need to pop-out this diecut flower – I saw this flower on a card by Louise Sharp and it in fact inspired this card – but when I went to use my die to cut it out, I realized that the die actually just die cuts the petals so they curl up from the cardstock… it doesn’t cut the whole thing out of the paper! However, it is an easy 30 second fix to just grab your snips and snip the one spot in between each petal that keeps it connected to the cardstock. A few quick snips and you have a fun new die shape!

- Think outside the suite for coordinating accents – I had the card coming together using the cardstock, stamps, stickers, and even designer paper from the Eastern Palace suite. But it still needed that elusive something. Thankfully I remembered the Fabulous Foil Acetate from the current Annual Catalog. It is super easy to miss and in fact, I often forgot I even had some from my part of last year’s product sampler I ran. But if you look at that mosaic gold piece above the purple paper, it is a printed window sheet that coordinates PERFECTLY with this suite! I’m so glad it is carrying over, because now that I realized how fab it actually is; I plan to use the heck out of it. 🙂


(thank goodness for samplers saving the day with this card! and yes, I have just released new product samplers for the upcoming catalog for when a year from now we discover that item that we never thought twice about, but now 11 months later is exactly perfect for a project!)
So, what do you think of this card and this suite?
I’d love to hear your thoughts… please leave me a comment below and let me know what YOU think of the Eastern Palace Suite!
Make this project at home! Here is what you’ll need:


Check out more great ideas on the Fun n’ Crafty Blog Hop!
So, that was my idea using something new from the upcoming catalog. While you can order the discounted bundle this month, you will be able to order individual pieces from this Eastern Palace suite starting June 1st! And if you just can’t wait, we’d love to have you join our Fun n’ Crafty team! Order your starter kit and you can get this bundle, plus $21.50 in product more for less than the price of the bundle alone! You’ll be able to order it today and then consider joining us on our blog hop next month. 🙂
In the meantime, keep the inspiration going by checking out Christine’s projects next!


- Christine Szekeres – Artful Musings
- Merit Brown – MB Squared Designs
- Pamela Wu – Stinky Tofu
- Susan Schultz – Stampin’ by the SF Bay
- Stacey Lane – A Work of Carte
- Jennifer Blomquist – Northwest Stamper <– YOU ARE HERE
![NWstamper signature_thumb[9]](https://i1.wp.com/www.nwstamper.com/wp-content/uploads/ad87b4046c1e_C9F6/NWstamper-signature_thumb9_thumb.png?resize=322%2C118 "NWstamper signature_thumb[9]")
![]()


