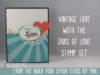
Ok, I just had to share one of my favorite cards from the Build Your Stash card class by mail! Check out this fun Sending Love card featuring the Jars of Love stamp set!
When I originally started designing the class, I had been planning on focusing on the Better Together stamp set – because it is a great sentiment set – as well as the Cupcakes & Carousels designer paper stack. But when I pulled out this sunburst patterned paper from the pack, things just started going in a totally different direction. And in the end, I felt the card had a bit of a vintage feel and somehow the sentiments from the Jars of Love set were exactly the right fit.

Tips for making this card:
- Layer your Punches – Two of my favorite punches are retiring this month – the Decorative Label punch and the Sweetheart punch. Now, I knew layering a large oval (either from the retired wide oval punch, or the current Layering Ovals framelits) over the Decorative Label punch always looks classic; but I don’t always think about layering other shapes. But matching up a punched shape (a heart, a flower, etc) with your sentiment or the overall feel of your card can end up making it be the perfect accent to your other layered pieces.
- Everything doesn’t always have to be centered! Now I’ll admit this took me a long time to become ok with. 🙂 I love my even borders and like everything to be balanced. But sometimes, pushing everything to the side ends up emphasizing it more. In this case, I had the sunburst piece and it was cut so that the center of the sun ray was off to the right. So, when that happens, run with it! I placed the doily mostly over the center of the sun ray and then centered the punched pieces on that.
- Mix your textures for a more interesting card – popping up your shapes on dimensionals help, having patterned paper and cardstock helps, but it really steps up your card when you start mixing different textures as well. In this case, I added the soft 1/4″ Very Vanilla satin ribbon across the top of the designer paper (it’s subtle, but really helps soften everything). Then I added the three pearls in the upper right corner of the oval. They helped tie together the punched pieces and add some extra softness in an area where you can’t see the ribbon.

So, what do you think? Its a fun card that is easy to make but is a WOW for the person you love that you are giving it to! Want to make a couple of them along with the rest of the set?
You have until May 15th to sign up for this limited time class or while my supplies last. So don’t delay!

>>> Click HERE to sign up <<<
Want to make this card at home? Here are the project supplies:


 Satin Ribbon")


![NWstamper signature_thumb[9]](https://i1.wp.com/www.nwstamper.com/wp-content/uploads/ad87b4046c1e_C9F6/NWstamper-signature_thumb9_thumb.png?resize=322%2C118 "NWstamper signature_thumb[9]")
![]()